The Quick Answer (30 Seconds)
Breast tissue escaping the cup — over the top, at the sides, near the center, or underneath — means the cup is not containing the tissue the way it was designed to. The cause fitting guides name first is genuinely too-small cups. But it is not the only reason, and “just go up a cup” misses real cases: a band that is too tight can distort the cups, a wire that is too narrow can sit on tissue and push it outward, a cup that is too shallow can fail to hold tissue that has nowhere to go, and tissue that was never guided into the cups will read as spillage in a bra that might otherwise fit.
In search results you may see this symptom called “quad boob” — a slang phrase for the same thing. This guide uses neutral fit language throughout: the problem is the bra’s fit and construction, not your body.
The boundary: this guide covers tissue escaping the cup (overflow). If your cups sit empty at the top instead — fabric standing away from the body — that is the opposite symptom, covered in our guide to why bra cups gape at the top.
The 60-Second Fit Check
Run these in order before diagnosing anything — they rule out setup before structure:
- Put the bra on properly. Fasten on the loosest hooks (a new bra should fit there), lean forward, and let the tissue settle into the cups.
- Scoop and settle. With the bra on, guide all tissue from the sides and under the arms into the cups — fitting guides call this the stoop-scoop-swoop, and HerRoom’s fitting tests treat it as the standard first step. Stand straight and reassess.
- Check the wire. The underwire should enclose the base of the breast and sit flat on the ribcage — not rest on tissue at the sides or front.
- Check the band. Slide two fingers under the band at the back. It should grip firmly without pain; the band should sit level, not riding up or digging in hard.
- Move. Sit down, stand up, raise your arms, bend slightly forward. Does the tissue stay contained — or does it start escaping at one spot?
- Note where overflow begins. Top edge? Sides near the underarm? Center? Underneath? The location is your diagnostic compass — the router below reads it.
One adjustment never permanently fixes a structurally wrong fit. If the checks above don’t resolve the spillage, the bra’s size, shape, or construction is the issue — diagnose it below.
The Location Router: Where Is It Spilling?
1. Spillage over the top of the cup
Observation: tissue pushes over the top edge, most visible when you look down or bend forward.
Possible mechanism: cups too small (most common), or cups too shallow for the tissue’s depth — same volume, wrong depth distribution.
Quick check: scoop and settle, then bend forward. Does the tissue stay in — or immediately push back out?
What the result means: immediate push-out after scooping means the cups cannot contain the tissue: too small or too shallow.
Next step: Causes 1 (size) and 4 (depth) below.
2. Spillage near the center/gore
Observation: tissue crowds toward the center, sometimes touching or overlapping at the gore.
Possible mechanism: cups too small, or a gore/wire setup that doesn’t separate the cups enough for the tissue’s distribution.
Quick check: does the gore sit flat against the sternum, or is it floating/pushed forward by tissue?
What the result means: floating gore + center spill usually means the cups are overwhelmed — but if the cups fit elsewhere, the cup’s center geometry may be the issue.
Next step: Causes 1 and 3 below.
3. Spillage near the underarm/outer edge
Observation: tissue escapes at the sides, near the underarm, sometimes with the wire visibly sitting on tissue.
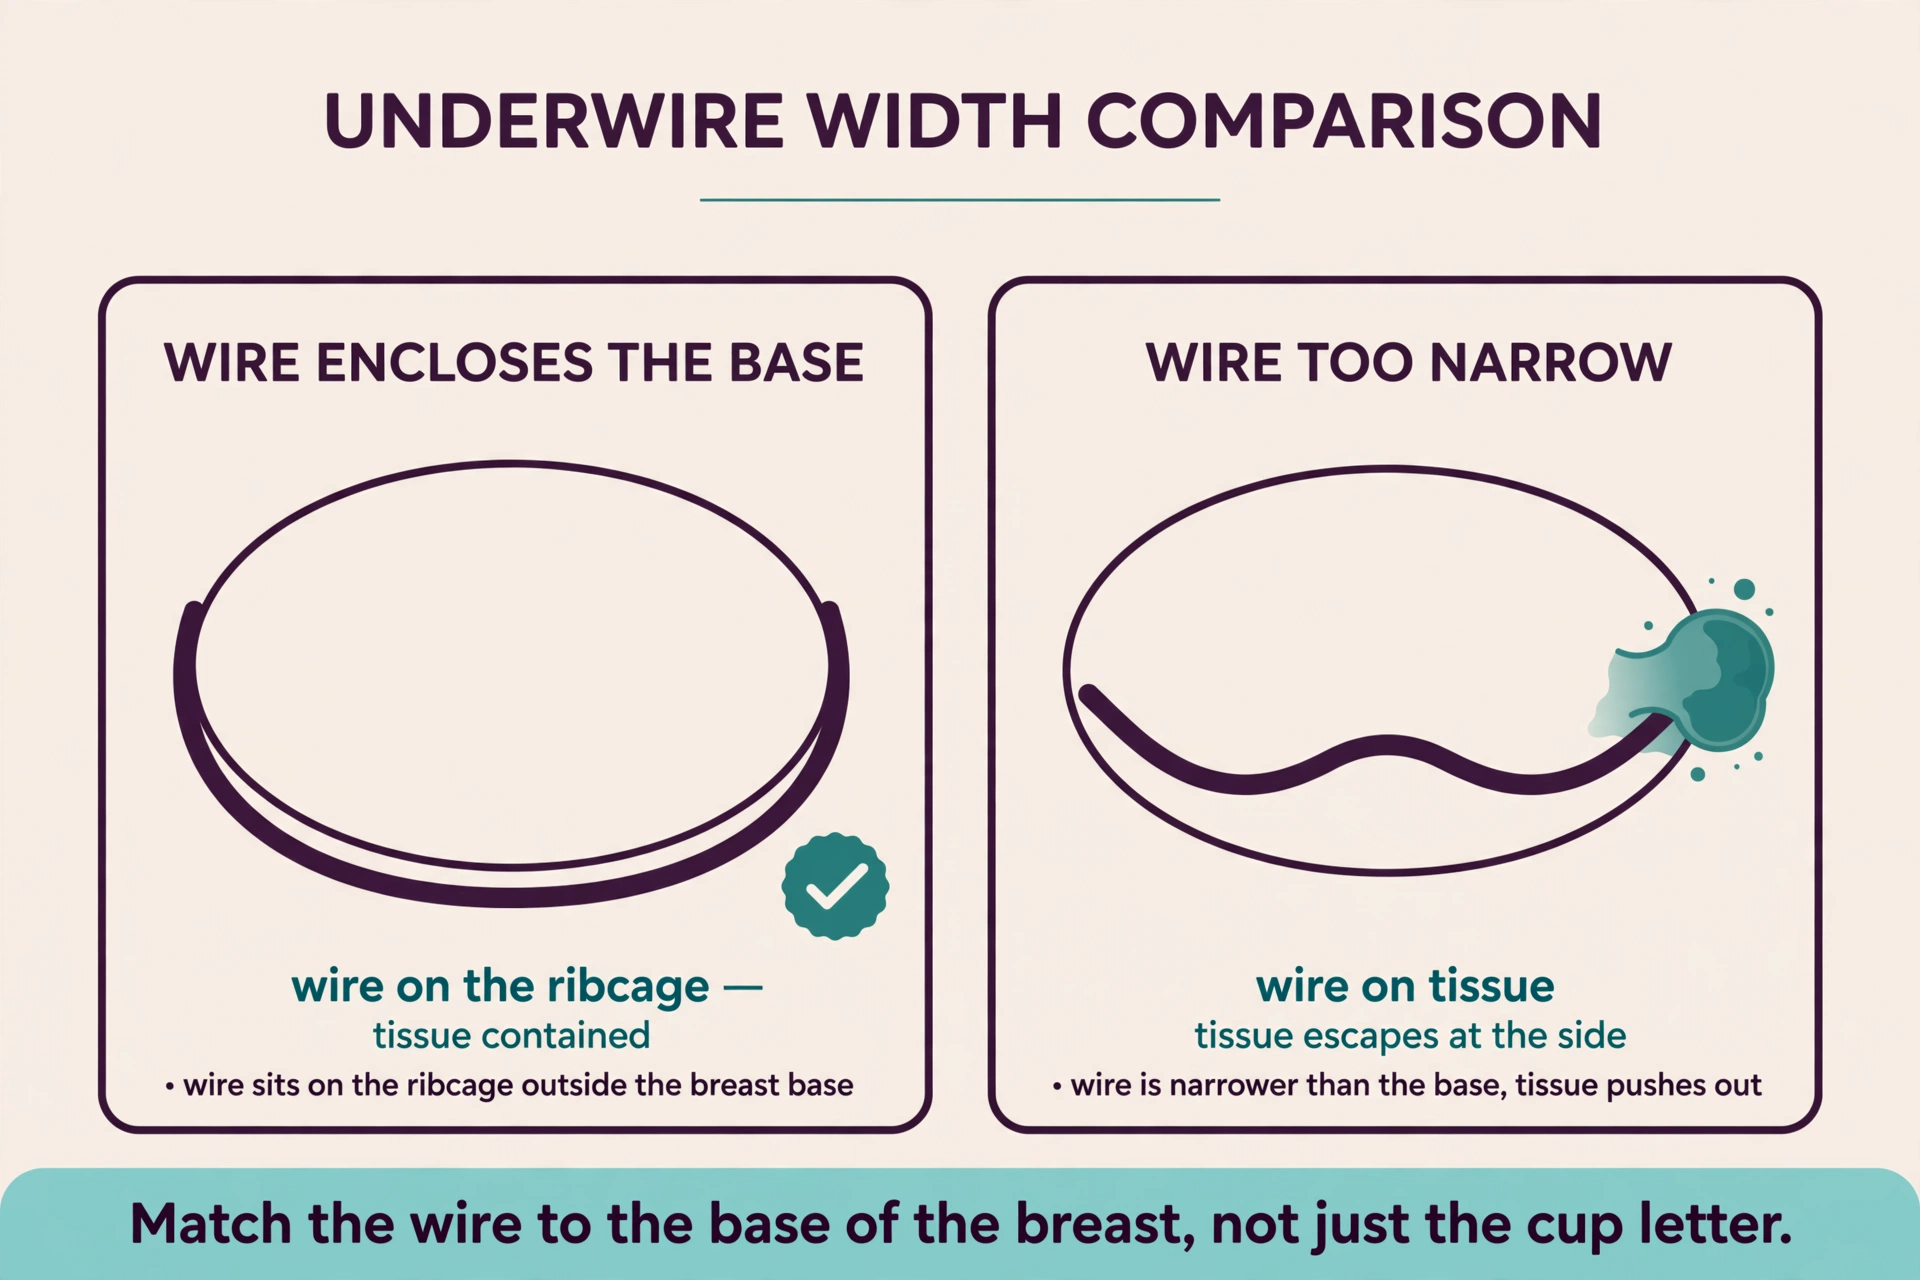
Possible mechanism: wire too narrow for the breast’s base — the wire “cuts off” tissue at the sides instead of enclosing it.
Quick check: press gently where the wire ends at the underarm. Is it resting on soft tissue rather than on the ribcage? Fitting resources describe this with wire-width guidance: the wire should encircle the breast, not sit on it.
What the result means: wire on tissue = the cup’s width doesn’t match the breast’s base, whatever the cup letter says.
Next step: Cause 3 below.
4. Tissue escaping underneath the cup/band
Observation: tissue slips below the wire or the wire rides down, sometimes with the band riding up at the back.
Possible mechanism: band too loose to anchor the cups (the front drops and tissue escapes below), or cups too small pushing everything downward.
Quick check: is the band level? If it rides up at the back, the anchor is failing — band riding up + tissue underneath = band too loose (see our guide to why bra bands ride up).
What the result means: a level band + under-spill points to cup capacity; a riding band points to the band.
Next step: Causes 1 and 2 below.
5. Spillage appears mainly after movement/sitting/raising arms
Observation: the bra looks fine standing still, but tissue escapes when you move, sit, or lift your arms.
Possible mechanism: borderline cup capacity revealed by motion, straps set too loose to hold the cup tops, or a cup whose edges lack the structure to track movement.
Quick check: after moving, does re-scooping restore containment — and how long does it last?
What the result means: if containment collapses within minutes of normal movement, the fit is marginal: the bra is at the edge of its capacity.
Next step: Causes 1, 6, and 7 below.
Cause 1: The Cups Are Genuinely Too Small
The first thing fitting guides name, and often the right answer. When the cup holds less volume than the tissue, the excess has to go somewhere — over the top, at the sides, or at the center.
Signs
- Tissue visibly escapes the cup in more than one place
- Scooping and settling makes it worse, not better — there’s nowhere for the tissue to go
- The band feels tight, but going up a band alone doesn’t fix the overflow
- The gore won’t sit flat because tissue is pushing the cups apart
The check
The scoop test from the fit check: guide all tissue in, stand straight, move normally for a minute. If tissue immediately re-escapes, the cups are too small.
The fix
Go up one cup letter, keeping the band the same — one variable at a time. Our guide to reading lingerie size charts covers how to use the brand’s own chart as the decision tool rather than guessing.
Cause 2: The Band Is Too Tight — The Paradox
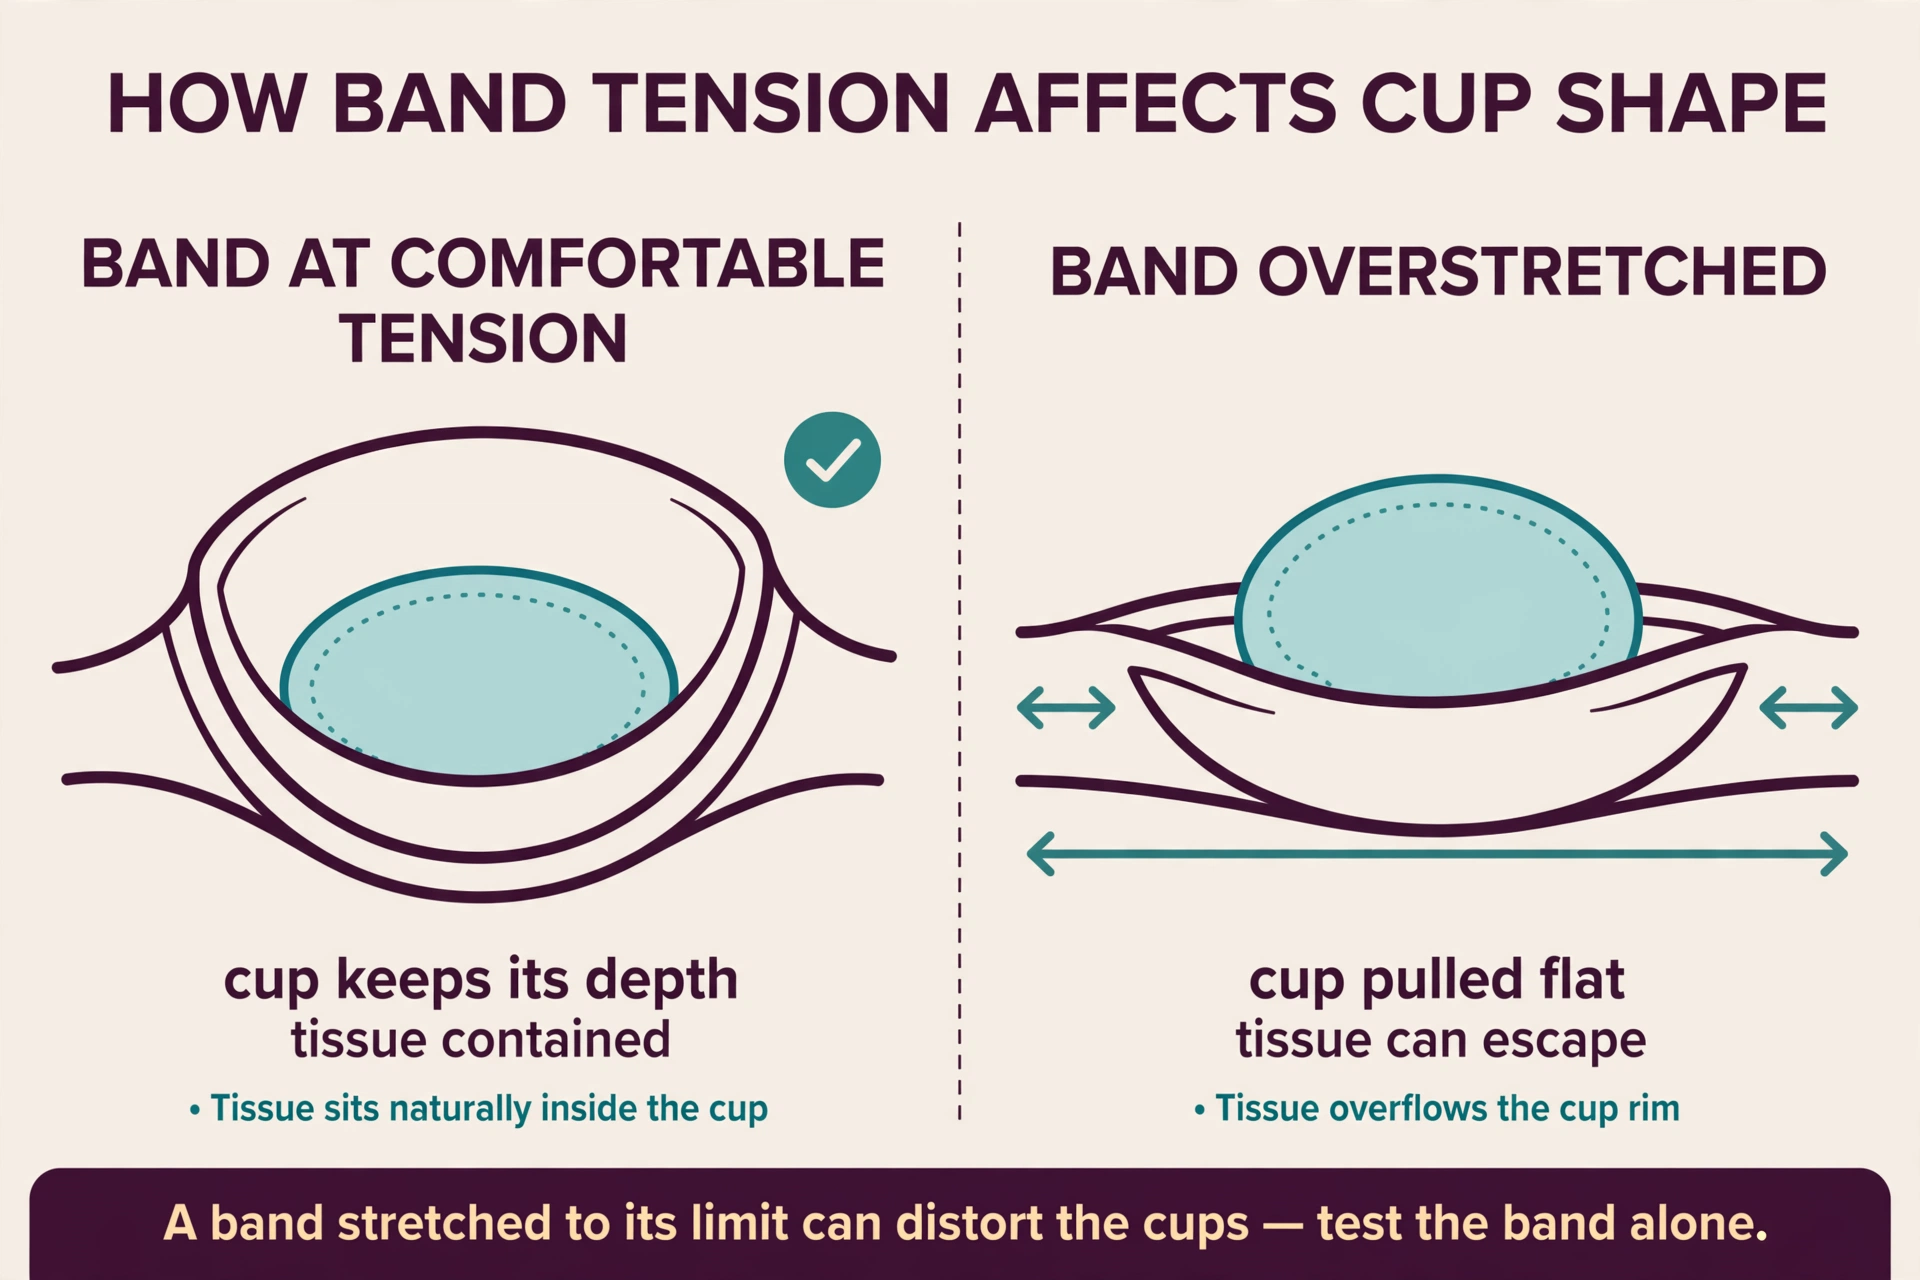
Here is the case that breaks “just size up.” A band stretched to its absolute limit can pull the cups flatter and wider, reducing their depth — and a shallower cup contains less tissue. The result looks like too-small cups while the real distortion comes from the band.
But there is a second, more common direction to this paradox: cups that are too small make the band feel tight, because the tissue has nowhere to go and the whole garment is under strain. In that case the band isn’t the problem at all — the cups are (Cause 1), and the tight feeling is a symptom.
Signs
- The band feels painfully tight AND tissue spills — which came first is the question
- Red marks that fade within minutes are normal; deep grooves and pain are not
- The cups look flattened or pulled wide rather than deep
The check
The band-alone test: fasten the bra upside-down and backwards (cups hanging down your back) so only the band is doing work. Does the band feel comfortable on its own? If yes, the tight feeling came from too-small cups (Cause 1). If the band alone is painfully tight, the band is genuinely too small — go up a band and reassess the cups after.
The fix
Fix the band first if it fails the band-alone test: a band that fits lets the cups keep their designed depth. Only then judge the cups. And treat the “tight band distorts cups” direction as conditional — it can happen, but the more common story is small cups making everything feel tight.
Cause 3: The Wire Is Too Narrow
The underwire’s job is to enclose the base of the breast — the full footprint where tissue meets the ribcage. If the wire is too narrow, it sits on tissue instead of around it, and the tissue it cuts off spills at the sides.
Signs
- Spillage concentrated at the outer edges, near the underarms
- The wire’s underarm end rests on soft tissue rather than bone
- The gore may sit fine while the sides overflow — a width problem, not a volume problem
The check
Press where the wire ends at the underarm and at the gore. The wire should sit on the ribcage all the way around, enclosing tissue. As fitting specialists describe this plainly, a too-narrow wire “cuts off” tissue at the sides. If the wire sits on tissue, the cup is too narrow for the breast’s base — regardless of what the cup letter says.
The fix
Look for cups with a wider wire in the same volume — different brands and styles vary in wire width at the same size. This is a geometry hunt, not a size-up: a larger cup in the same narrow wire often just moves the problem.
Cause 4: The Cup Is Too Shallow
Two cups can hold the same volume with completely different depth. A shallow, wide cup and a deep, narrow cup are not interchangeable — tissue that projects forward needs depth, and a shallow cup will spill at the top or center even when the nominal size is “correct.”
Signs
- Spillage over the top despite the band and wire fitting well
- The cup letter seems right but the tissue has nowhere to go forward
- Seamed cups in the same size contain the tissue while molded cups don’t (or vice versa) — a depth-distribution clue
The check
Compare cup styles, not sizes: try the same size in a seamed, multi-part cup (which typically offers more depth) versus a molded cup. If the seamed cup contains the tissue, the issue was depth distribution, not volume.
The fix
Shop for depth: seamed or multi-part cups, or styles known for deeper construction. The cup letter measures volume; it doesn’t promise depth.
Cause 5: Molded Construction Can’t Contain the Tissue
A molded cup is a fixed shape. A seamed, multi-part cup is an adaptable one — its panels can flex and distribute tissue.
Fitting resources consistently describe seamed cups as more supportive and more adaptable to varied tissue distribution than molded cups — see HerRoom’s cup-style guide for a construction-by-construction comparison — but neither construction is universally better: a molded cup that matches the tissue is smooth and containing; a seamed cup in the wrong size spills just the same.
Signs
- Spillage specifically in smooth molded cups, but not in seamed styles in the same size
- The cup feels like a fixed shell that the tissue sits on rather than in
- The top edge of the mold digs or gaps while tissue escapes elsewhere
The check
The construction swap: same size, seamed cup. If containment improves, the mold’s fixed geometry was the constraint.
The fix
For tissue the mold can’t contain, move to seamed construction in the same size — don’t just size up the mold. And don’t read this as “molded bras are bad”: the lesson is that rigidity punishes mismatch while flexibility forgives it.
Cause 6: The Tissue Was Never Scooped In
Sometimes the bra fits and the tissue simply isn’t in the cups. Tissue migrates — under the arms, toward the back — through the day, and a bra put on without guiding it in will read as spillage in a garment that might otherwise work.
Signs
- Spillage that disappears completely after a proper scoop-and-settle
- The bra fit fine in the fitting room but “stopped fitting” by afternoon
- Tissue visibly sitting outside the wire line at the sides
The check
The scoop test: lean forward, guide all tissue into the cups, stand straight. If everything is contained and stays contained through normal movement, the bra was fine — the setup was the problem.
The fix
Make the scoop part of putting the bra on, and re-scoop after long sits or activity. If containment collapses within minutes no matter how carefully you scoop, the issue is structural (Causes 1–5), not setup.
Cause 7: The Bra Is Worn Out
Elastic fatigues. A band that has lost its grip rides and shifts; cups that have lost their structure stop containing. A bra that fit six months ago can develop spillage as the elastic dies — the garment is looser everywhere, so tissue that was contained now escapes.
Signs
- The bra used to contain everything and gradually got worse
- You’re on the tightest hooks and the band still moves
- The cups look stretched, rippled, or misshapen off the body
The check
The history test: did this bra ever fit well? If yes, it’s wear, not size. Stretch a band section and release — lively elastic snaps back; dead elastic returns slowly or not at all.
The fix
Replace it. Extend the next bra’s life: rotate between bras, hand-wash or use a mesh bag, fasten hooks before washing, keep bras out of the dryer.
Bad Advice to Ignore
“Just go up a cup size.” The most repeated spillage advice, and the most misleading as a universal fix. Going up a cup is the right move for genuinely too-small cups (Cause 1) — and wrong for a too-tight band distorting the cups (Cause 2), a too-narrow wire (Cause 3), a too-shallow cup (Cause 4), or un-scooped tissue (Cause 6). Diagnose first, resize second.
“Spillage always means the band is too big.” Sometimes a loose band contributes (router branch 4), but spillage with a painfully tight band is the opposite problem. The band and the cups are separate variables — test them separately.
“Molded bras are just bad.” No — a molded cup that matches the tissue is smooth, supportive, and invisible under clothes. Rigidity isn’t a flaw; mismatch is.
What to Look for When Buying
- Cup capacity with depth in mind. The letter is volume; the style decides depth. If shallow cups always spill on you, shop seamed or deeper-cut styles.
- Wire width for your base. The wire should encircle the breast’s footprint on the ribcage. If the wire also digs or sits on tissue painfully, that is a separate diagnosis — our guide to why underwires dig into ribs covers wire pain cause by cause.
- The band on the loosest hooks. Firm from day one — that’s your adjustment reserve, and your insurance against both looseness and over-stretch distortion.
- A scoop-friendly cup. Enough structure at the sides to hold tissue once guided in.
- The brand’s own size chart, read properly. Wire widths and cup depths vary between brands at the same size; the chart plus garment measurements beat the letter.
- A workable return policy. Spillage sometimes only reveals itself after hours of real wear — you need a living-room test, not a ninety-second fitting room verdict.
A Short Note
Spillage itself is a fit issue, not a medical one. But if you notice a sudden change in breast size or shape, persistent pain, skin changes, or a lump, have it evaluated medically rather than troubleshooting fit. This guide diagnoses garments; it doesn’t diagnose bodies.
FAQ
Is it normal for breasts to spill out of a bra a little when I move?
A small, fleeting shift during vigorous movement can happen in an otherwise workable fit — tissue moves and no bra tracks every motion perfectly. Persistent spillage during normal standing, sitting, and walking is worth diagnosing with the checks above.
Should I go up a cup size if my breasts spill out?
Only if the cups are genuinely too small: tissue re-escapes immediately after scooping, the band passes the band-alone test, and the wire encloses the base. If the band is painfully tight on its own, the wire sits on tissue, or the cup is shallow, sizing up the cup alone fixes nothing or moves the problem.
Why do my breasts spill out when the band feels tight?
Two possibilities: the cups are too small (making everything feel tight — the most common story), or the band is genuinely too tight and distorting the cups. Run the band-alone test: fasten the bra upside-down and backwards. Comfortable band alone means the cups are the problem; a painfully tight band alone means the band is the problem.
Can a different bra style fix spillage without changing size?
Yes — when the issue is depth or construction rather than volume. A seamed, multi-part cup in the same size can contain tissue that a shallow molded cup spills, and a wider wire in the same volume can fix side spillage. Change the construction variable before the size variable.
Why does only one side spill out?
Natural asymmetry — one side is fuller, and the cup sized for the fuller side may still be marginal there while the smaller side fits. Fit the fuller side without spillage or pain; accommodate the smaller side with the same approaches used for gaping asymmetry. It’s ordinary, not a flaw.
The bottom line
Tissue escaping the cup is a symptom, not a diagnosis. It can mean the cups are too small — but it can just as easily mean the band is distorting the cups, the wire is too narrow for the breast’s base, the cup is too shallow for the tissue’s depth, a fixed mold can’t contain what a seamed cup could, the tissue was never guided in, or the bra is simply worn out. Locate the spill, run the checks, name the cause, fix that cause. The size label was never the whole story; the garment’s geometry always was.
2 thoughts on “Why Do My Breasts Spill Out of My Bra? (7 Causes and How to Fix Each)”
Comments are closed.