You put on a bra. The band feels fine — maybe even snug. The underwire sits where it should. But at the top of each cup, there’s empty space: fabric standing away from your body, a visible gap when you look down, sometimes enough to see inside the cup. So you do the obvious thing and assume the cups are too big.
Sometimes that’s the answer. But often it isn’t — and “fixing” gaping by sizing down the cup is how many women trade one fit problem for two. A gap at the top of the cup simply means the cup’s top edge isn’t meeting breast tissue. That can happen because the cup is genuinely too large. It can also happen because a loose band dragged the cup away from the body, because the cup’s shape doesn’t match the breast’s shape, because a rigid molded cup kept its own geometry instead of following yours, because the straps are set up wrong, because one breast is fuller than the other, or because the bra is worn out.
This guide diagnoses which one is yours — with the same method as our other fit guides: Cause → Signs → Check → Fix. Start with the 60-second diagnostic. Most readers will identify their cause there.
The Quick Answer (30 Seconds)
Empty space at the top of the cup means the cup and the breast aren’t occupying the same geometry. The three families of reasons:
- The cup is too big — genuinely more cup than breast. Smaller cup (or sister size) is the fix.
- Something is pulling the cup away — a loose band riding up, or straps set wrong. The cup might be the right size; it’s just not sitting where it should.
- The cup is the wrong shape — right volume, wrong geometry. The fix is a different cup cut or construction, not a different size.
Everything below sorts your gaping into one of these families.
The 60-Second Diagnostic
Do these in order, in front of a mirror. Stop at the first check that fails — it points to your cause.
1. The band check. Is the band level all the way around — parallel to the floor? Slide two fingers under it at the back. If the band rides up or you can fit more than two fingers easily, suspect the band first (Cause 2) — a cup can’t sit flush when its anchor is migrating.
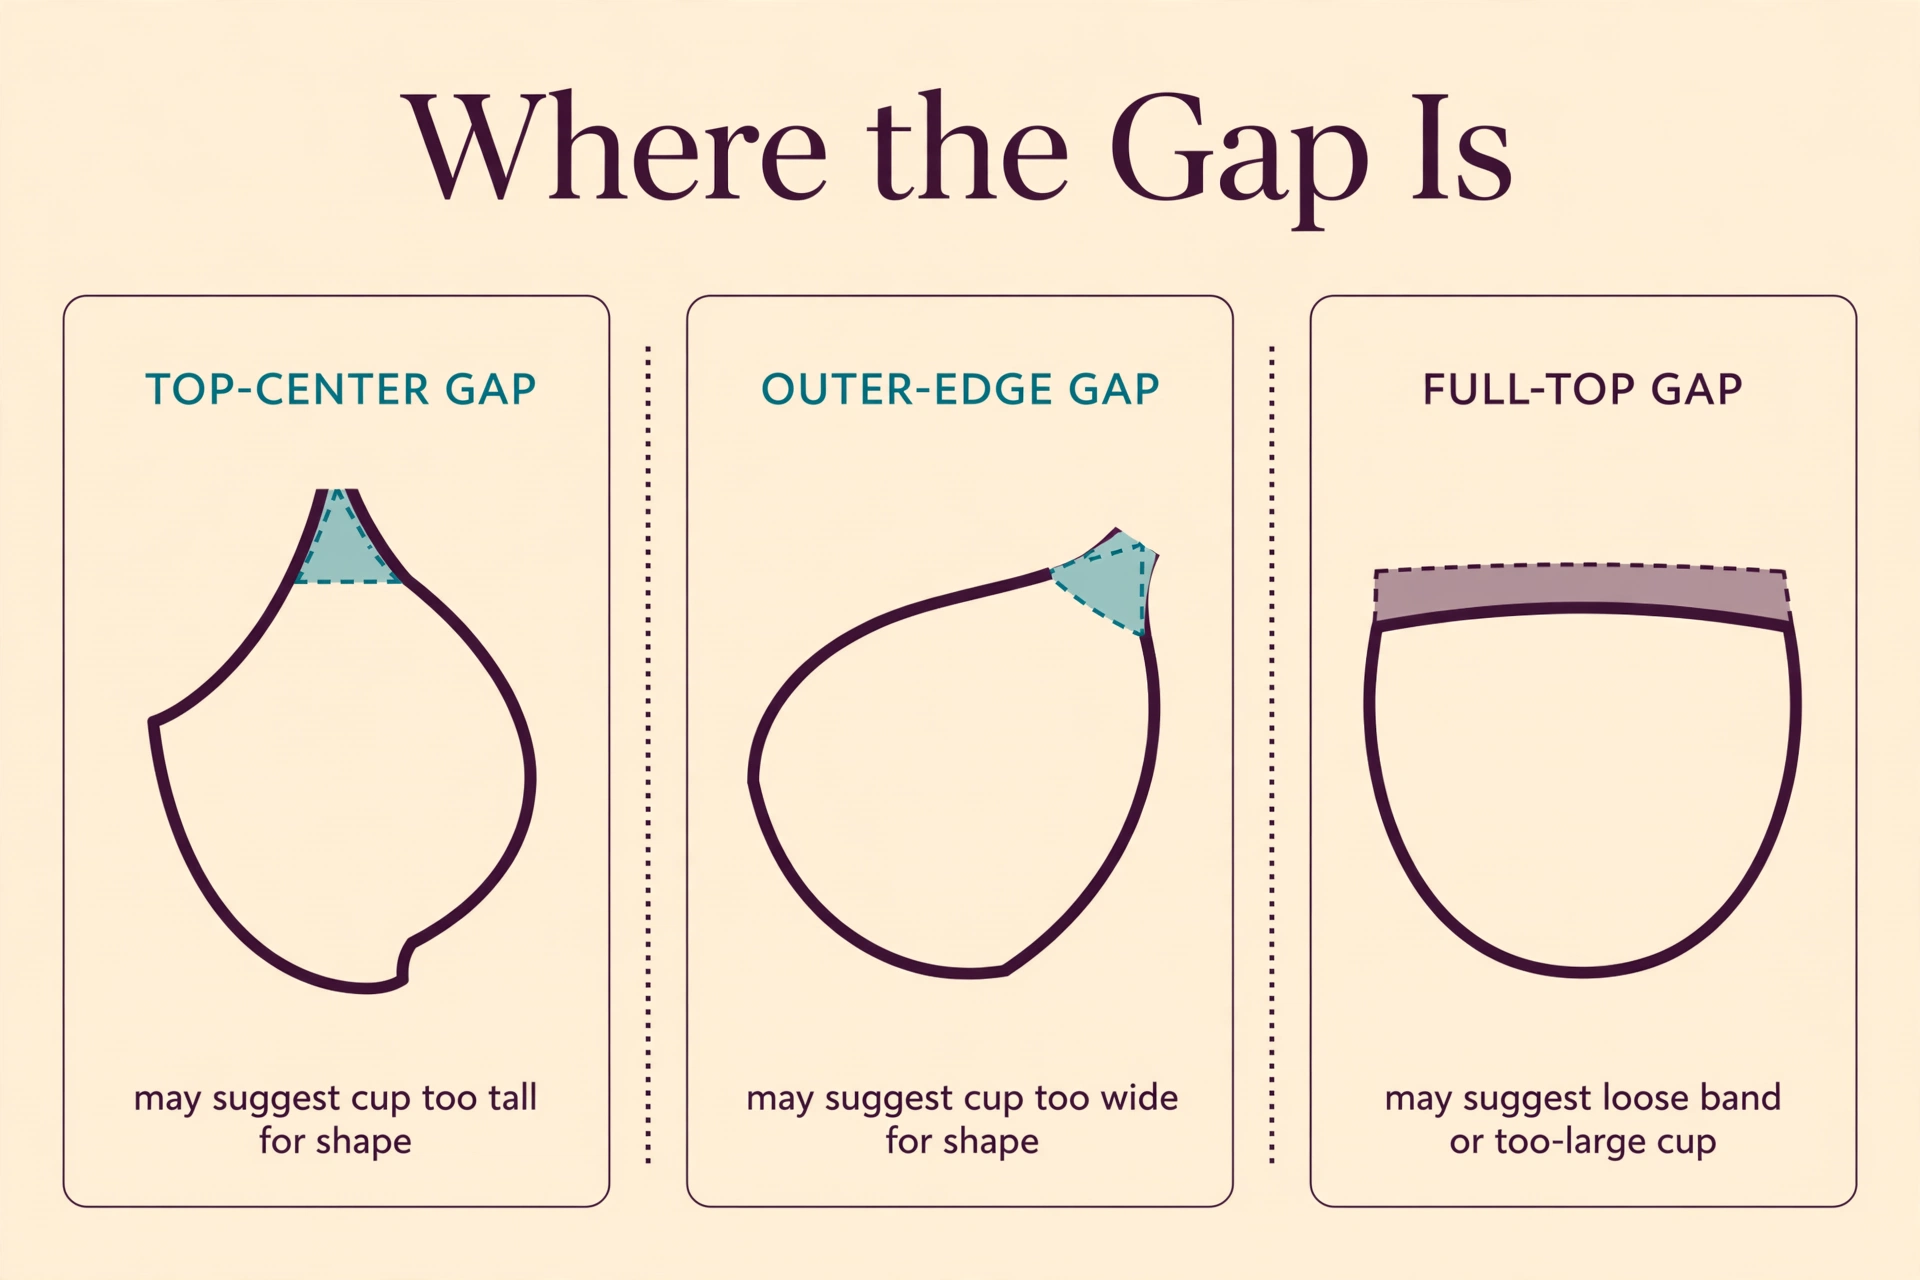
2. The location check. Where exactly is the empty space? Top-center only? Outer edge near the armpit? The full width of the top? One side only? Location is a clue, not proof — but it narrows the field (see the map below).
3. The fill check. Scoop and settle: lean forward, guide all breast tissue into the cups, then stand straight. Does the tissue now fill the cup — or spill over it? If scooping creates spillage, the cups are too small, not too big (this matters enormously for the paradox section below).
4. The strap check. Slide two fingers under each strap. They should move with slight resistance — not hang loose, not dig trenches. Straps that are far too loose let the cup tops fall away from the chest; straps cranked brutally tight are usually masking a different problem.
5. The movement check. Sit down. Bend forward slightly — fitting guides recommend a sitting test for exactly this reason. Does the gap appear only when you move — or is it there standing perfectly still? Movement-only gaping is often a coverage or posture effect, not a sizing failure.
6. The symmetry check. Is the gap on both sides equally, or mostly one side? One-sided gaping has its own cause (Cause 6).
Where the Gap Is: A Location Map
Where the empty space sits is genuinely informative — as a clue that tells you what to check next, never as a guaranteed diagnosis.
- Gap across the full top edge, both cups — more consistent with a band that’s too loose (the whole front is being pulled away) or cups that are genuinely too large. Check the band first.
- Gap at the top-center only — more consistent with a cup that’s too tall or too open at the top for the breast’s shape: the tissue sits lower than the cup’s top edge expects.
- Gap at the outer/top edge near the armpit — more consistent with a cup that’s too wide or too shallow for the shape — the outer cup has geometry the tissue doesn’t fill.
- Gap on one side only — more consistent with natural asymmetry: that side’s breast is smaller than the cup sized for the fuller side.
- Gap that appears sitting or bending, gone standing — more consistent with movement and coverage: the breast shifts within the cup when the torso folds.
Cause 1: The Cups Are Genuinely Too Large
The simplest cause — and the one every fitting guide names first. When the cup holds more volume than the breast, the excess fabric has nowhere to go, so the top edge stands away from the body. This is the correct diagnosis when the gap is the only symptom: band level, straps reasonable, wire sitting properly, no spillage anywhere.
Signs
- Empty space across much of the cup’s top edge, on both sides
- The cup fabric wrinkles or collapses slightly when you move
- The band is level and snug; the underwire sits flat behind the tissue
- No spillage at the top, sides, or center — the issue is purely emptiness
The check
The fill check from the diagnostic: scoop and settle, then look. If the breast sits comfortably inside with room to spare at the top — and nothing spills when you lean forward — the cup is too large.
The fix
Go down one cup letter, keeping the band the same (36C → 36B) — if the band fits well. If the band is also loose, use a sister size instead: down a band and down a cup keeps the relationship honest (36C → 34B keeps roughly the same cup volume on a firmer band — but only when the band genuinely needs firming; see Cause 2). One step at a time: change one variable, then reassess.
Cause 2: The Band Is Too Loose
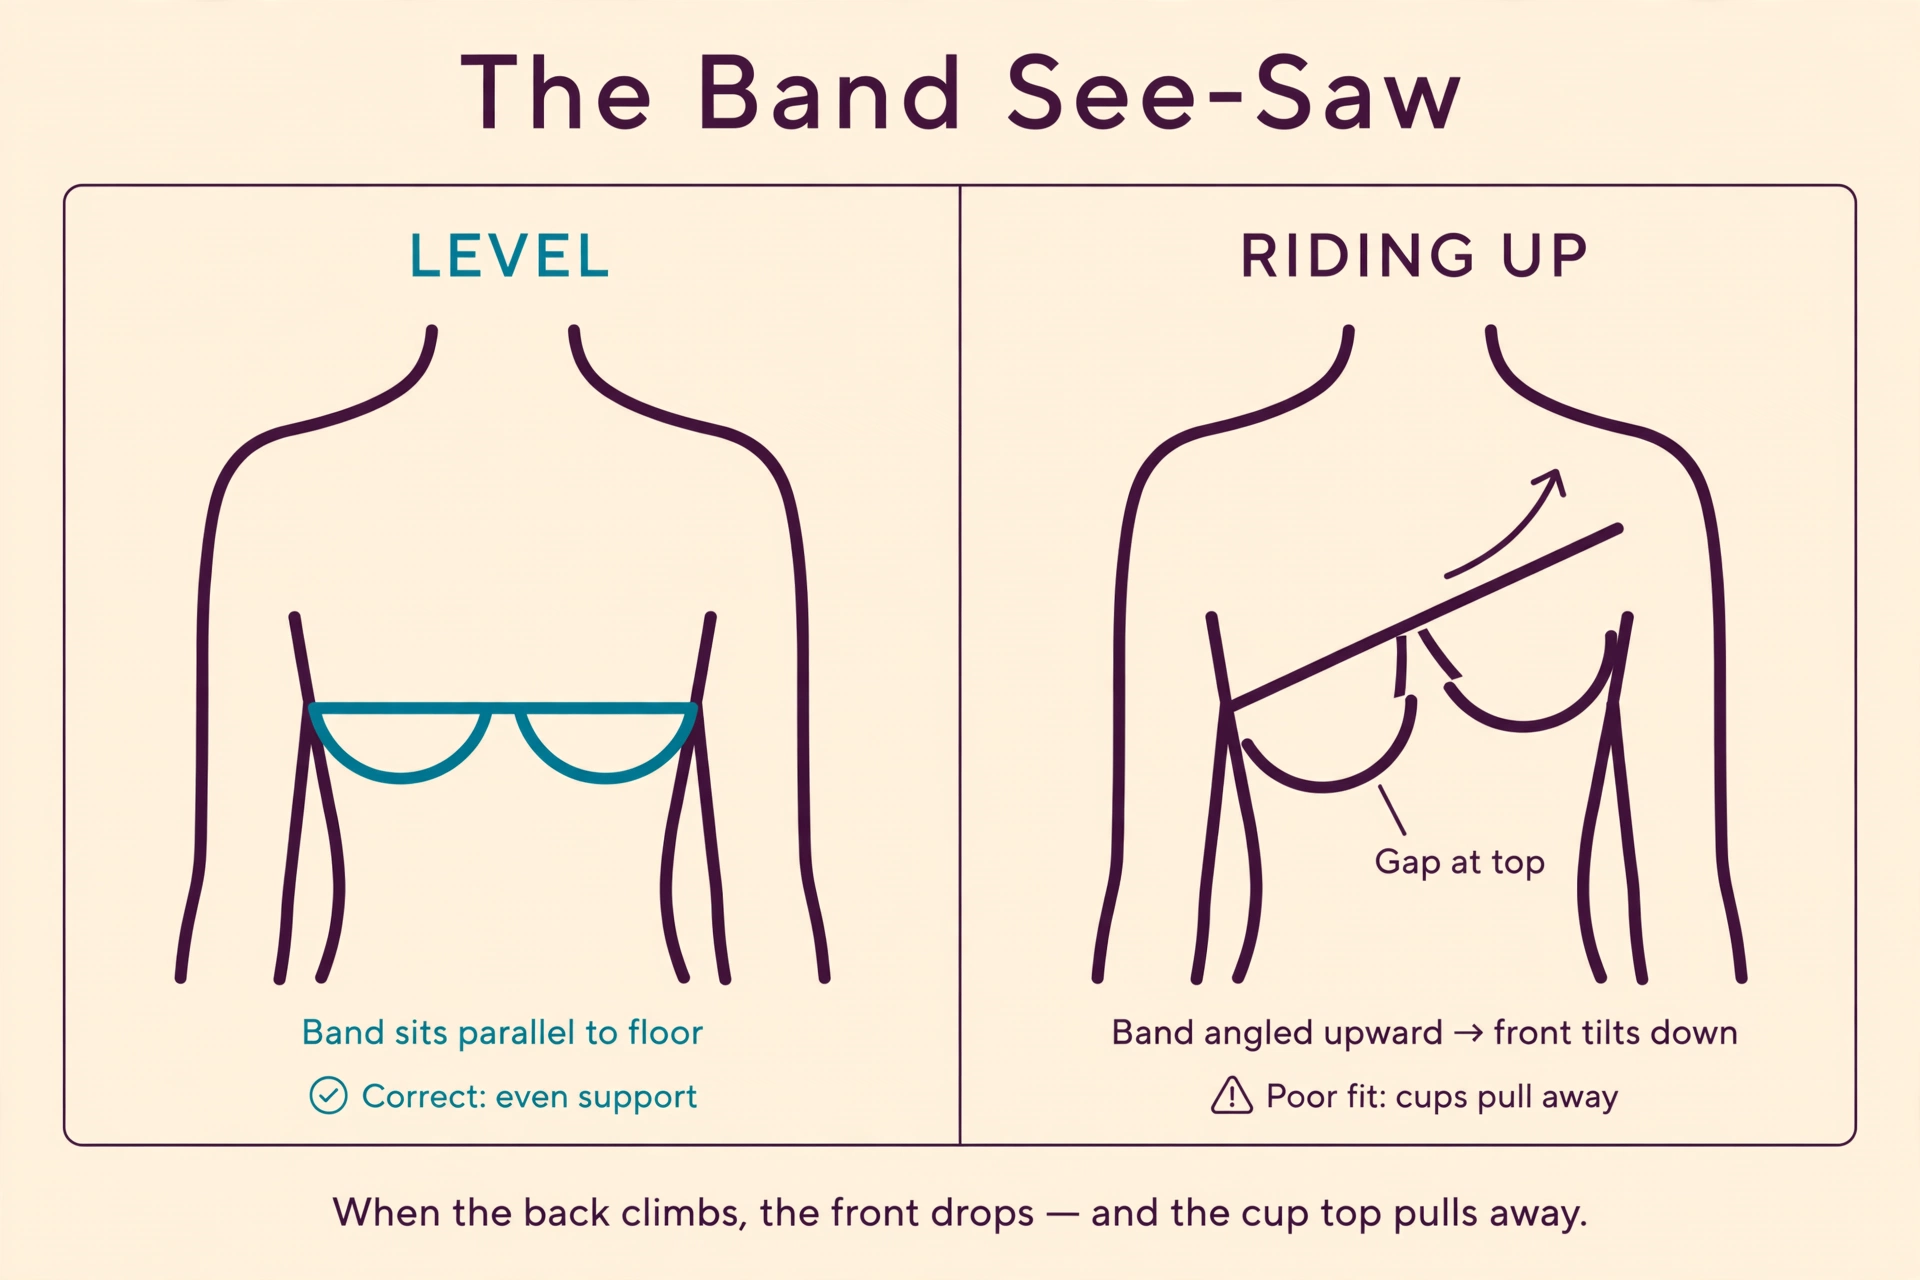
This is the most under-diagnosed cause of top gaping — and the mechanism is pure physics. When the band is too loose, it rides up the back (it always migrates toward where the torso is narrower). Think of a see-saw: when the back goes up, the front goes down. The front of the bra drops and tilts, and the top edges of the cups pull away from the chest. The cups might be exactly the right size — they’re just not sitting where they were designed to sit.
This is also why “tighten the straps” backfires here: cranking the straps when the band is loose hauls the back of the band even higher, which drops the front further and widens the gap. Strap-tightening treats the symptom’s shadow while feeding the cause.
Signs
- The band is not level — it angles upward at the back
- The gaping gets worse as the day goes on (fine in the morning, gaping by afternoon)
- You can fit more than two fingers under the band, or you’re on the tightest hooks and it still moves
- Tightening the straps seemed to help for an hour, then the gap came back worse
The check
Stand sideways to the mirror: is the band parallel to the floor? Then do the arms-up test — raise both arms overhead. If the band jumps and the cups lift off the chest, the band is too loose to anchor anything.
The fix
Fix the band, not the cups. Go down one band size and up one cup letter together (36C → 34D) so the cup volume stays the same while the band firms up. Our guide to why bra bands ride up covers the full band mechanics — the same see-saw is at work here. Reassess the gaping only after the band sits level; many “too big cups” turn out to have been fine cups on a failing anchor.
Cause 3: The Cup Shape Doesn’t Match the Breast Shape
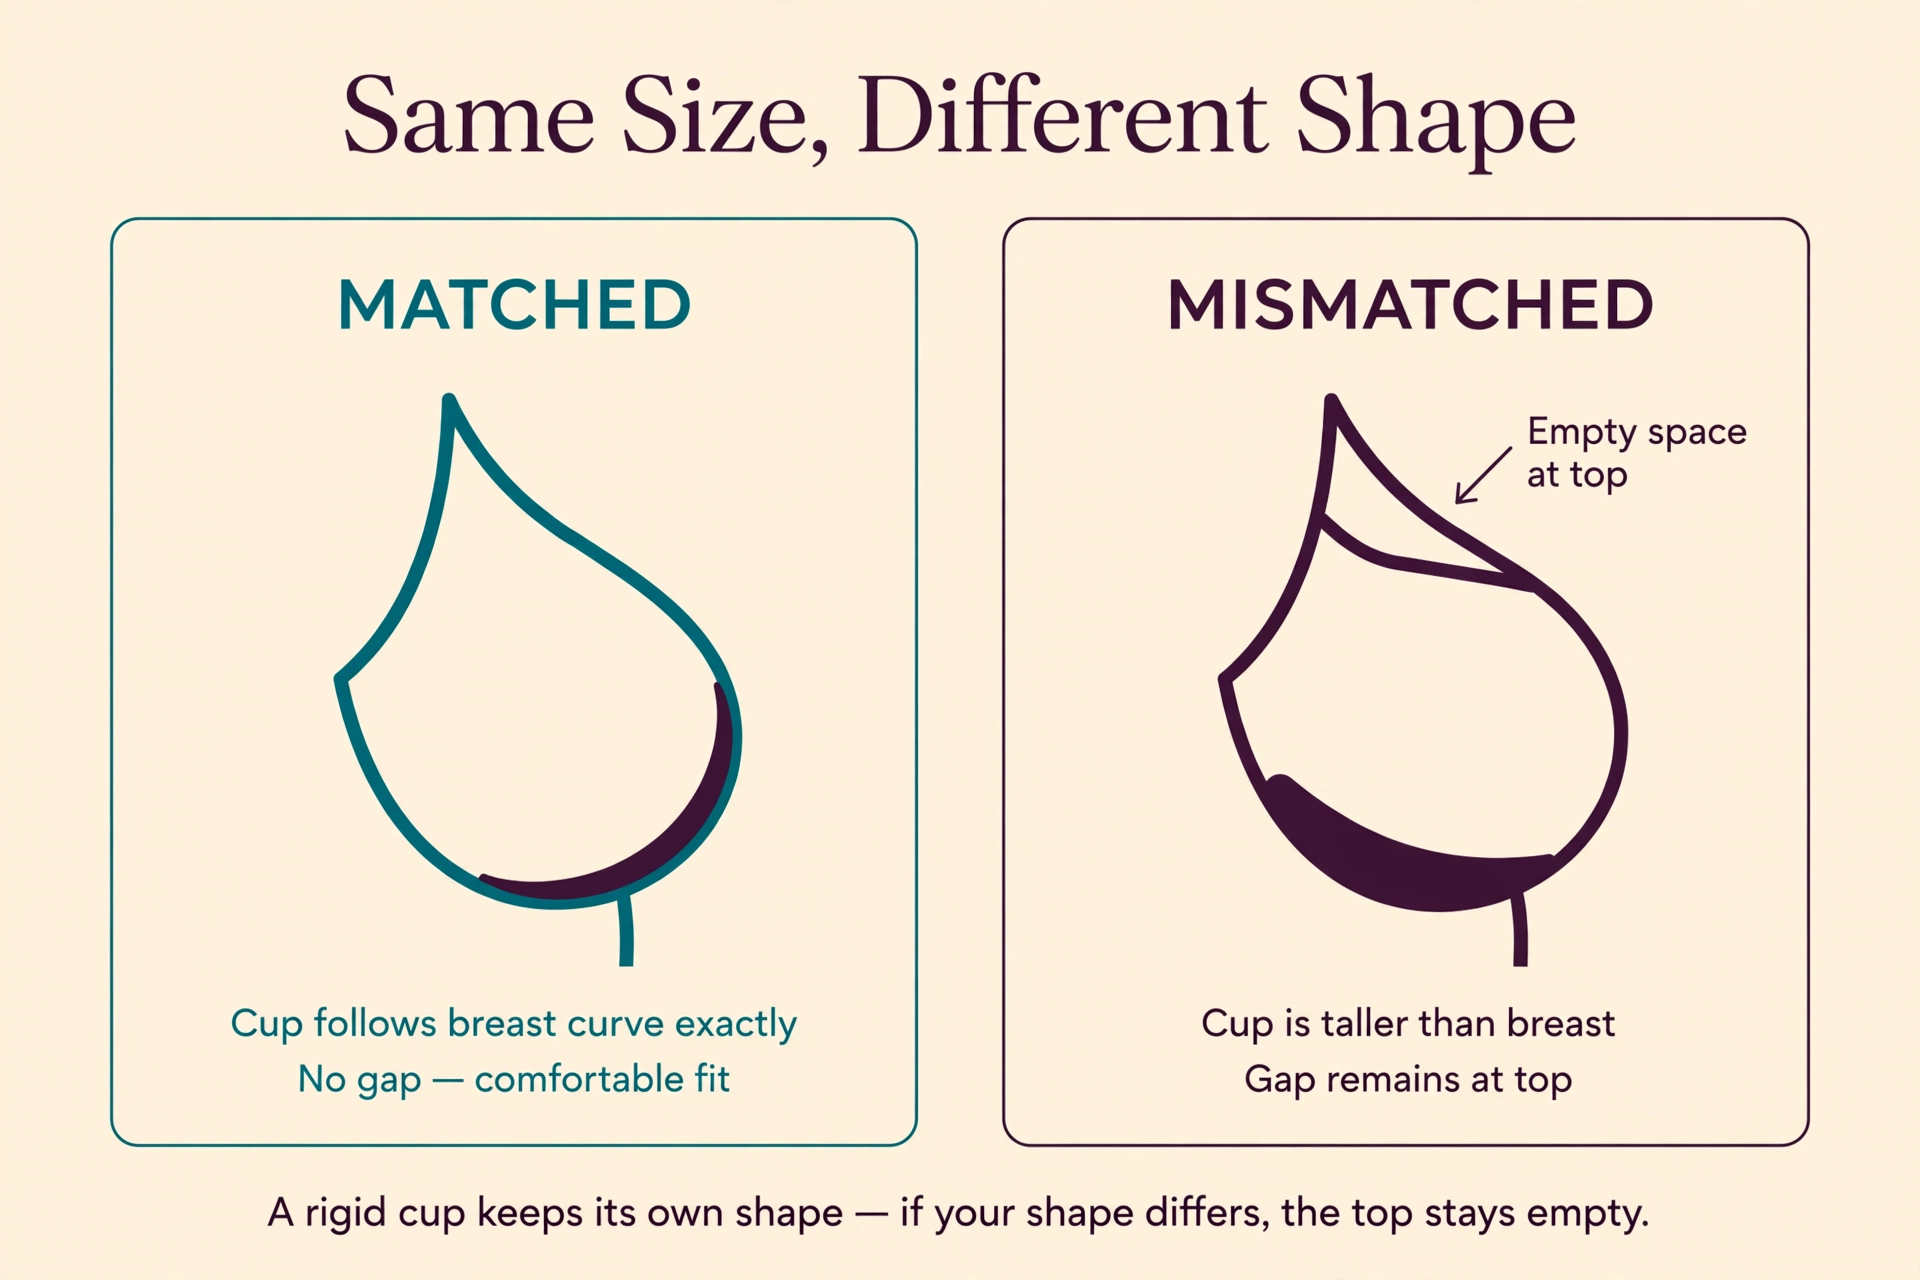
Here’s the cause the size chart can’t see. Two bras in the identical size — same brand, same 34D — can have completely different cup geometries: one tall and open at the top, one shorter with a more closed neckline. If the breast’s tissue sits lower and the cup’s top edge expects tissue higher up, you get a gap at the top in the right size.
Fit specialists describe this plainly: when the breast’s weight rests lower in the cup, the top stays empty — and certain cup cuts (angled, closed-top, or shorter-coverage styles) solve it where a smaller size of the same cut won’t. A smaller cup in the same too-tall shape just gives you a smaller version of the same gap, often with new spillage at the sides.
Signs
- The band is level and snug; the wire sits properly; straps are reasonable — yet the top-center gapes
- Sizing down one cup created spillage or tightness without closing the gap
- The gap is worst in tall, open-top, or full-coverage cuts and better in shorter or more closed cuts
- The breast fills the bottom and sides of the cup fully — only the top is empty
The check
Compare cuts, not sizes: try the same size in a shorter-coverage or more closed-top style (a demi or balconette rather than a tall full-coverage cut). If the gap shrinks while everything else stays comfortable, the issue was geometry, not volume.
The fix
Change the cut, not the size. Look for cups with a lower neckline, a more closed top edge, or a shorter apex height. This is a construction hunt: the right shape in your measured size, not a different size in the wrong shape.
Cause 4: A Rigid Molded Cup Is Keeping Its Own Shape
A molded (contour) cup is heat-formed into a fixed three-dimensional shape — and firm foam doesn’t negotiate. As lingerie construction writers describe it, a contour cup shapes the breast rather than the other way around: the padding is firm and can’t be stretched to follow tissue it doesn’t match. If the breast’s curve differs from the mold’s curve, the cup holds its geometry and the top stands empty — even when the nominal size is correct.
A seamed, unlined cup behaves the opposite way: multiple fabric panels joined by seams can flex and follow the breast’s actual curve. That’s why the same person can gape in a molded cup and fit cleanly in a seamed cup of the same size — the flexible cup conforms where the rigid one dictates.
Signs
- Gaping specifically in smooth molded/t-shirt bras, but not in seamed or unlined styles in the same size
- The cup feels like a fixed shell: it doesn’t move with the breast when you shift
- The gap is at the top while the bottom of the cup fits — the mold’s apex is taller than the tissue’s
The check
The construction swap: try the same size in an unlined, seamed cup. If the gap disappears, the mold was the problem — not the size. (Note the reverse check too: if an unlined cup wrinkles at the edges, that points to genuinely too-large cups — Cause 1.)
The fix
For breasts the mold doesn’t match, move to seamed or unlined construction in the same size — don’t just size down the mold. And don’t read this as “molded bras are bad”: a molded cup that matches the breast is smooth, invisible under clothes, and perfectly good. The lesson is that rigidity punishes mismatch while flexibility forgives it.
Cause 5: The Straps Are Set Up Wrong
Straps cause gaping in two opposite ways — which is why strap advice is so confusing.
Too loose: the straps aren’t holding the cup tops up against the chest, so the top edges sag forward and away. This is the one situation where adjusting the straps genuinely helps: the fix really is to take up the slack — until two fingers slide under with slight resistance.
Cranked too tight: overtightened straps haul the cups upward, distort the cup shape, and — when the band is loose — drag the back band up and drop the front (the see-saw from Cause 2). Tightening past the point of “snug” doesn’t close gaps; it creates new fit distortions while masking the real cause. If you’ve tightened the straps to their limit and the gap persists, the straps were never the problem.
Signs
- Straps sliding off or visibly slack → too loose; the cup tops fall away
- Deep red grooves on the shoulders, straps at maximum tightness, gap still there → overtightened and masking
- The gap appeared (or worsened) right after a big strap adjustment
The check
Reset the straps to neutral: loosen them fully, then take up slack until two fingers fit underneath with slight resistance. Reassess the gap before touching anything else. If neutral straps + level band still leaves a gap, the cause is elsewhere (Causes 1, 3, or 4).
The fix
Set straps to their proper job — steadying the cups, not hoisting them. Straps carry only a small share of support; the band does the anchoring. If correct strap length doesn’t fix the gap, stop adjusting straps and diagnose the cup or band instead.
Cause 6: Natural Asymmetry — One Side Gapes
Almost everyone has one breast slightly fuller than the other, and the difference is sometimes enough that a cup sized for the fuller side gapes on the smaller side. This isn’t a defect in the bra or the body — it’s geometry: one cup, two slightly different volumes to fill.
Signs
- The gap is clearly worse on one side; the other side fits well
- Everything else about the fit is right — band level, wire positioned, no spillage
- The smaller side’s strap may also slip more (less tissue filling the cup means less to hold the strap’s position)
The check
Fit to the fuller side — always. Then confirm: does the fuller side fit without spillage or pain? If yes, the size is right and the smaller side’s gap is an asymmetry effect, not a sizing error.
The fix
Don’t size down to fix the smaller side — you’ll strangle the fuller one. Instead: choose cups with a bit of stretch or flexible seamed construction so each side conforms somewhat independently; try a small insert or light padding on the smaller side; or tighten that side’s strap a touch (the rare case where asymmetric strap adjustment is legitimate). Asymmetry is ordinary — the fix is accommodation, not correction.
Cause 7: The Bra Is Worn Out
Elastic fatigues. With months of wear and washing — especially heat — the band loses its grip and the cups lose their shape. A bra that fit perfectly six months ago can develop top gaping as the band stretches (hello, Cause 2 by another route) and the cup structure softens and collapses.
Signs
- The bra used to fit without gaping and gradually got worse
- You’re on the tightest hooks and the band still moves
- The cups look rippled, collapsed, or misshapen when the bra is off
- The elastic feels soft and ribbon-like rather than springy
The check
The history test: did this bra ever fit well? If yes, it’s wear, not size. Also the tug test on the band — stretch a section and release; lively elastic snaps back, dead elastic returns slowly or not at all.
The fix
Replace it — dead elastic doesn’t come back. Extend the next bra’s life: rotate between bras so each rests between wears, hand-wash or use a mesh laundry bag, fasten the hooks before washing, and keep bras out of the dryer. Heat is elastic’s fastest killer.
The Paradox: Why Does My Bra Feel Tight but the Cups Still Gape?
This is the question that breaks the “just size down” logic — and it has two real explanations.
Explanation 1: shape mismatch with a correct (or snug) band. The band grips fine. The wire sits fine. But the cup’s top is taller or more open than the breast’s shape needs, so the top stays empty while everything else feels snug. Sizing down the cup “fixes” the gap by making the whole cup smaller — and creates spillage, digging, and discomfort everywhere else. The tightness was never the problem; the geometry was.
Explanation 2: cups too small, pushing the cup away. When the cups can’t contain the tissue, the breast pushes the whole cup forward and outward — and the top edge lifts off the chest, looking like gaping while everything feels tight. The tell: spillage at the top, sides, or center alongside the gap, and a band that feels restrictive. Here the fix is a larger cup, not a smaller one — the opposite of what the gap suggests.
If the cups are overflowing rather than sitting empty or gaping, use our spillage troubleshooting guide.
How to tell them apart: scoop and settle, then lean forward. Spillage + tightness → cups too small (go up). No spillage, comfortable containment, empty top → shape mismatch (change the cut, not the size). Getting this distinction right is the difference between solving the problem and buying three more wrong bras.
Sizing Problem or Construction Problem? How to Tell
This is the decision the whole guide builds toward. Work it in order:
- Gap everywhere, band riding up, worse through the day → sizing (band too loose). → Cause 2
- Gap with wrinkling cups, band level, no spillage → sizing (cups too large). → Cause 1
- Gap top-center only, band level, wire fine, sizing down didn’t help → construction (shape mismatch). → Cause 3
- Gap only in molded bras, fine in seamed → construction (rigidity). → Cause 4
- Gap appeared after strap fiddling, or straps at extremes → setup (straps). → Cause 5
- Gap one side only, other side perfect → neither — asymmetry. → Cause 6
- Used to fit, now gaps → wear. → Cause 7
- Gap + spillage + tight feel → sizing paradox (cups too small). → Paradox section
The expensive mistake is treating every gap as “too big” and marching down cup sizes. If two cup sizes in the same bra both gape, stop changing the size and change the bra.
A Note on Sister Sizing
Sister sizing — trading band and cup against each other to keep volume (34C → 32D, or 36C → 34D) — is the correct tool when both the band and the cup need to move. Going down a band and up a cup firms the anchor without shrinking the cups: the right move when the band is the problem (Cause 2). But sister sizes are not geometrically identical bras — the wire width, cup shape, and strap placement all shift slightly — so treat the sister size as a starting hypothesis to try on, not a guaranteed equivalent. Our guide to reading lingerie size charts walks through the brand’s own chart as the decision tool for exactly these moves. And sister sizing is not a universal fix for gaping: it can’t change a cup’s shape (Cause 3) or soften a rigid mold (Cause 4).
When a Little Gap Is Normal
Not every millimeter of space is a fit failure. Breasts move: when you sit, the torso folds and tissue shifts; when you bend forward, gravity pulls tissue away from the top of the cup momentarily; posture changes the chest’s geometry through the day. A bra that sits flush standing still but shows a small gap when you hunch over a desk is usually fine — no bra is engineered to track every movement perfectly.
The line: persistent gaping while standing still — the position the bra was fitted for — is worth diagnosing. Fleeting space during movement is the cost of having a body that moves. Don’t chase a fit that only exists in a fitting-room mirror pose.
What to Look for When Buying
Inspect the garment, not the marketing. Before buying, check:
- Cup height and openness for your shape. If tall, open-top cups always gape on you, look for shorter-coverage or more closed-top cuts (demi, balconette) in the same size.
- Cup construction: molded vs seamed. If molded cups consistently gape while seamed ones don’t, your shape wants flexibility — shop seamed/unlined in your measured size.
- The band on the loosest hook. It should grip firmly from day one — that’s your adjustment reserve as elastic ages, and your insurance against Cause 2.
- Wire position relative to your root. The wire should encircle the breast root and sit flat behind the tissue. If the wire is also sitting on tissue or digging, that’s a separate diagnosis — our guide to why underwires dig into ribs covers wire pain cause by cause.
- Strap adjustability and range. Fully adjustable straps with enough travel to reach neutral (two-finger) length — not straps already near their limit in the fitting room.
- The brand’s own size chart, read properly. Cup gradings and wire shapes differ between brands; the chart is the starting point, not the verdict. Our guide to reading lingerie size charts shows how to use it as a decision tool.
- A workable return policy. Top gaping sometimes only reveals itself after hours of real wear — you need a living-room test (sit, bend, reach), not a ninety-second fitting room verdict.
Bad Advice to Ignore
“Just tighten the straps.” The most repeated gaping advice, and the most misleading as a universal fix. Strap adjustment is a legitimate check — slack straps genuinely let cup tops fall away. But once straps are at a proper neutral length, further tightening doesn’t close gaps caused by band, size, or shape problems; it distorts the cups, digs the shoulders, and (with a loose band) drops the front further via the see-saw. If someone’s entire fix is “tighten more,” they haven’t diagnosed anything.
“Gaping always means go down a cup.” True for Cause 1 — and wrong for Causes 2 through 7. Applied blindly, it converts shape mismatch into spillage, converts a loose band into a still-loose band with tighter cups, and converts the tight-but-gaping paradox into genuine pain. Diagnose first, resize second.
“Molded bras are just bad.” No — a molded cup that matches the breast is smooth, supportive, and invisible under clothes. Rigidity isn’t a flaw; mismatch is. The right lesson is to know which construction your shape wants, not to declare a whole category defective.
A Short Note
Cup gaping itself is a fit issue, not a medical one. But if you notice a sudden change in breast size or shape, persistent pain, skin changes, or a lump, have it evaluated medically rather than troubleshooting fit. This guide diagnoses garments; it doesn’t diagnose bodies.
FAQ
Is it normal for bra cups to gape a little?
A small, fleeting gap when you sit, bend, or move is usually normal — breasts shift and no bra tracks every movement. Persistent gaping while standing still, in the position the bra was fitted for, is worth diagnosing with the checks above.
Should I go down a cup size if my cups gape?
Only if the cups are genuinely too large (Cause 1): wrinkling fabric, no spillage, level band, empty space with room to spare. If the band rides up, the shape mismatches, or there’s spillage alongside the gap, sizing down fixes nothing or makes it worse.
Why do my cups gape when my band feels tight?
Two possibilities: a shape mismatch (the cup’s top is taller or more open than your shape needs, while the band fits fine), or cups that are actually too small — tissue pushes the cup forward so the top edge lifts away. Scoop, settle, and lean forward: spillage means too small; clean containment with an empty top means shape mismatch.
Do I need a smaller cup or a different bra style?
If the band is level, the wire sits right, and the gap is only at the top-center, try a different cup cut (shorter coverage, more closed top) in the same size before changing sizes. If the gap is everywhere and the fabric wrinkles, try a smaller cup. Change one variable at a time.
Can tightening my straps fix gaping cups?
Only when the straps are genuinely too loose — taking up slack until two fingers fit underneath is a legitimate first check. Cranking them tighter than neutral doesn’t fix band, size, or shape causes; it distorts the cups and can worsen gaping through the band see-saw.
Why does only one cup gape?
Natural asymmetry — one breast is slightly fuller than the other, and the cup is sized for the fuller side. Fit the fuller side, then accommodate the smaller one (stretchy or seamed cups, a small insert, or a touch more strap tension on that side). It’s ordinary, not a flaw.
The bottom line
A gap at the top of the cup is a symptom, not a diagnosis. It can mean the cups are too big — but it can just as easily mean the band is dragging them away, the shape doesn’t match, a rigid mold is keeping its own geometry, the straps are wrong, one side is fuller than the other, or the bra is simply worn out. Locate the gap, run the checks, name the cause, fix that cause. The size label was never the whole story; the garment’s geometry always was.
2 thoughts on “Why Do My Bra Cups Gape at the Top? (7 Causes and How to Fix Each)”
Comments are closed.