A garter belt looks simple: a band around the waist, a few straps hanging down, some clips. But the first time you wear one, the simplicity is a trick. The belt migrates. A strap twists. A clip lets go of a stocking at the worst moment. And the advice you’ll find online is mostly “tighten the straps” — which, as you’ll see, is sometimes exactly the wrong fix.
The reason garter belts confuse people is that most guides treat them as a dressing procedure: put it on, clip the stockings, done. A garter belt isn’t a procedure. It’s a mechanical system — an anchor, a set of tension lines, and a set of grips — and it only works when all three cooperate. Once you understand the system, every problem becomes diagnosable instead of mysterious.
This guide follows three moves:
SET → STRAP → STAY
SET — position and size the belt correctly, because placement is the anchor everything else depends on.
STRAP — attach and tension the straps correctly, because the straps are a tension system, not decoration.
STAY — diagnose why the system slips, twists, or detaches, cause by cause, instead of guessing.
How a Garter Belt Actually Works
Forget the dressing steps for a moment. A garter belt is four components working as one system:
- The anchor. The belt itself, fastened around your waist or upper hip area. Its job is to stay put while everything below it pulls downward. If the anchor moves, nothing below it can stay stable — the way a tent collapses if its stakes pull out, no matter how good the ropes are.
- The tension lines. The straps (also called suspenders) run from the belt down to the stockings. They carry controlled downward tension — enough to hold the stockings up, not so much that they drag the belt down with them. This is the balance the whole system lives or dies on.
- The grips. The clips at the end of each strap attach to the stocking. A clip doesn’t just “hold” the stocking — it sandwiches a specific reinforced part of it (the welt) in a locking mechanism. Clip the wrong part of the stocking and the grip fails no matter how well everything else is set.
- The compatible load. The stockings themselves. Not every hosiery product is designed to be gripped by clips, and a system built for one type of stocking will misbehave with another.
Stability, then, is a four-way equation: anchor + strap geometry + clip grip + stocking compatibility. When something goes wrong, the fix is almost never “just tighten everything.” Tightening the straps of a poorly anchored belt, for instance, pulls the anchor down faster — the equivalent of yanking the tent ropes harder when the stakes are loose. Each section below teaches you to read one part of the equation.
SET, Part 1 — Where the Belt Should Sit
Placement is the single most consequential decision in garter-belt wearing, and it’s the one most guides rush past. Where the belt sits determines how well it can anchor — and anchoring is the foundation the straps depend on.
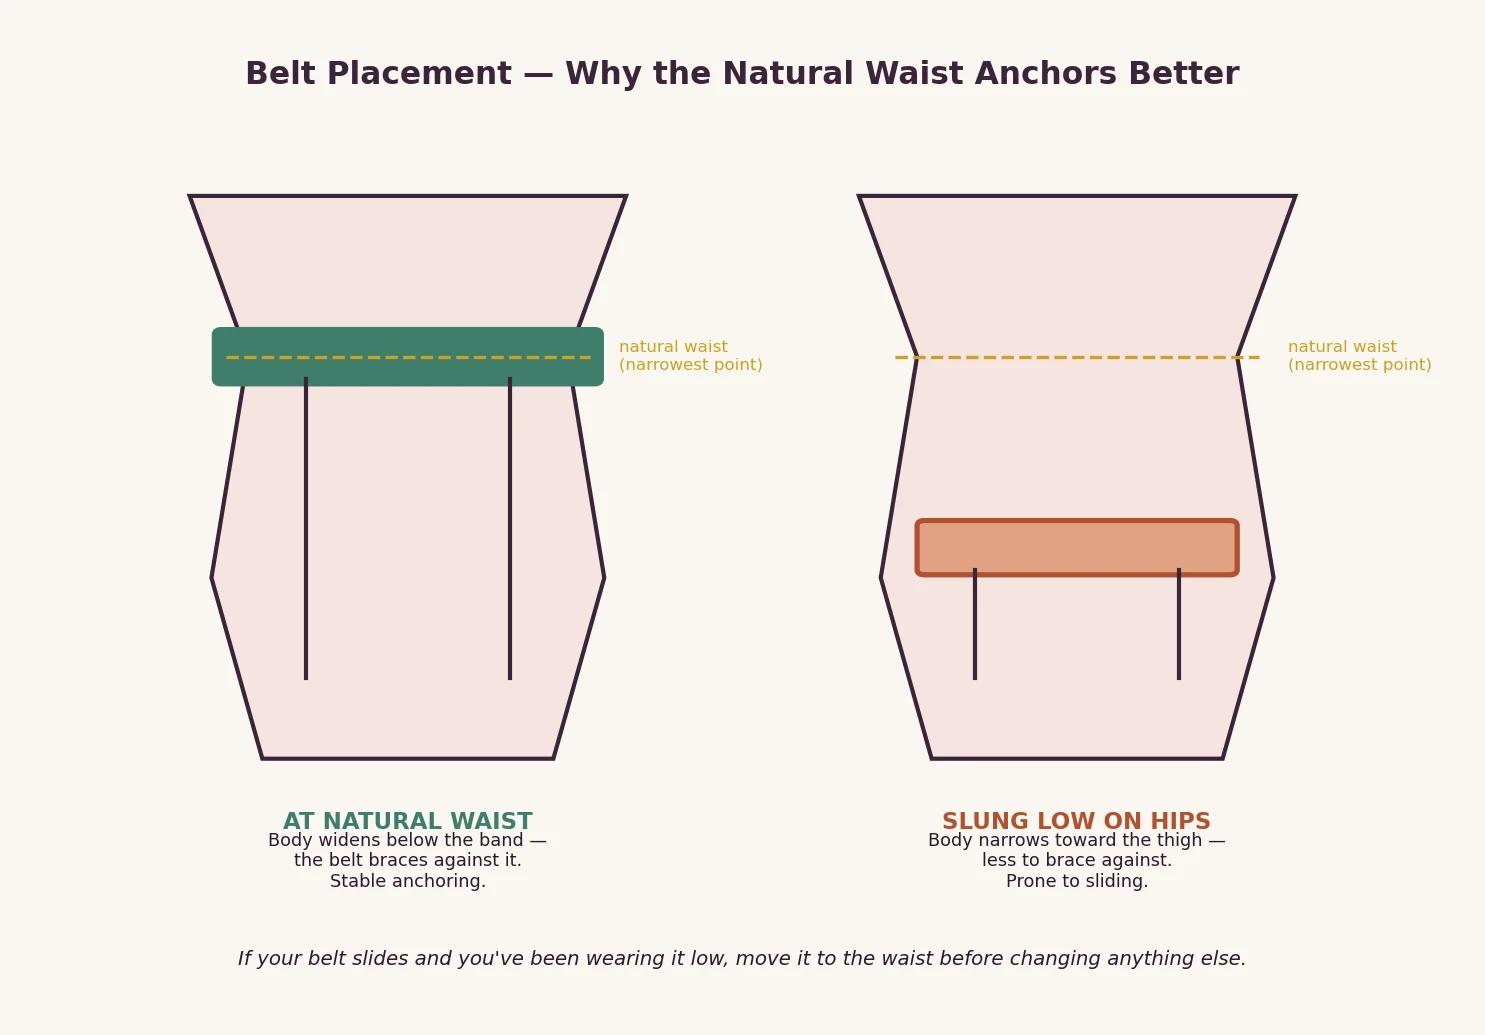
Natural-waist placement. The narrowest point of your torso, typically around or just below the navel. This is where most well-constructed belts are designed to sit, and there’s a mechanical reason: a band seated at the narrowest point resists sliding downward because the body widens below it. The belt would have to ride up over a wider circumference to move — which is exactly the anchoring behavior you want. Retailer fit guides (HerRoom’s Garters 101, for example) consistently advise resting the belt at the waist for this reason.
Lower-hip placement. Some belts are designed or styled to sit lower, on the upper hips. This can work — particularly with wide, structured belts built for it — but the anchoring physics are less forgiving: below the waist, the body’s circumference narrows toward the thigh, so a belt has less natural resistance to downward migration. A hip-slung belt that slides isn’t necessarily defective; it may simply be fighting geometry that a waist-seated belt doesn’t have to fight.
This doesn’t mean every garter belt must sit at precisely the same anatomical point. Construction differs enormously: shaped waistbands, wide elastic bands, and belts with substantial vertical structure anchor differently from narrow decorative bands. What matters is understanding the principle — the belt anchors best where the body gives it something to brace against — and then reading your specific belt’s design:
- Shaped waistbands (curved or contoured) are usually cut to follow the waist’s shape — a signal the designer intended waist placement.
- Elastic width matters: a wider band distributes grip over more surface and generally anchors more reliably than a narrow ribbon of elastic, all else equal.
- Closure position (usually hook-and-eye at the back, like a bra) tells you where the adjustability lives and which way the belt is meant to orient.
- Vertical strap length hints at the intended rise: if the straps only just reach your stocking tops when the belt sits at your waist, the belt was designed for waist placement.
- Intended rise is sometimes stated in the listing (“sits at natural waist” vs. “low-rise”) — when it is, believe it.
If your belt keeps sliding and you’ve been wearing it slung low on the hips, try seating it at the natural waist before changing anything else. For many people, that’s the entire fix.
SET, Part 2 — Size and Fit
A well-fitting garter belt should feel like this: it stays anchored when you move, it doesn’t rotate around your body easily, it doesn’t slide downward under light strap tension, and it doesn’t require painful compression to do any of that. If you have to cinch it to the point of discomfort to keep it up, the size or the placement is wrong — not your body.
The fit tradeoff is straightforward:
- Too loose → the anchor drifts. The belt migrates downward or rotates, and the straps follow it. No amount of strap adjustment fixes a loose anchor.
- Too tight → discomfort, and worse, distortion. An over-tightened belt can warp the strap angles, pulling clips sideways instead of straight down, which is itself a cause of twisting and detachment.
“Smaller is always more secure” is not a rule. Snug is the target; compressed is a warning sign.
If the retailer provides a size chart, use that brand’s chart — not a generic table, not your memory of another brand’s sizing. Garter belts are sized by waist or hip depending on intended placement, and brands differ in which measurement they grade to. Our size-chart guide walks through how to read any brand’s chart as a decision tool, including what to do when your measurements span two sizes — the same logic applies here.
STRAP, Part 1 — How to Attach the Clips
The clip is the most misunderstood part of the system, partly because it looks simpler than it is. Most garter clips share a common construction, though details vary by manufacturer — don’t assume every clip on every belt works identically.
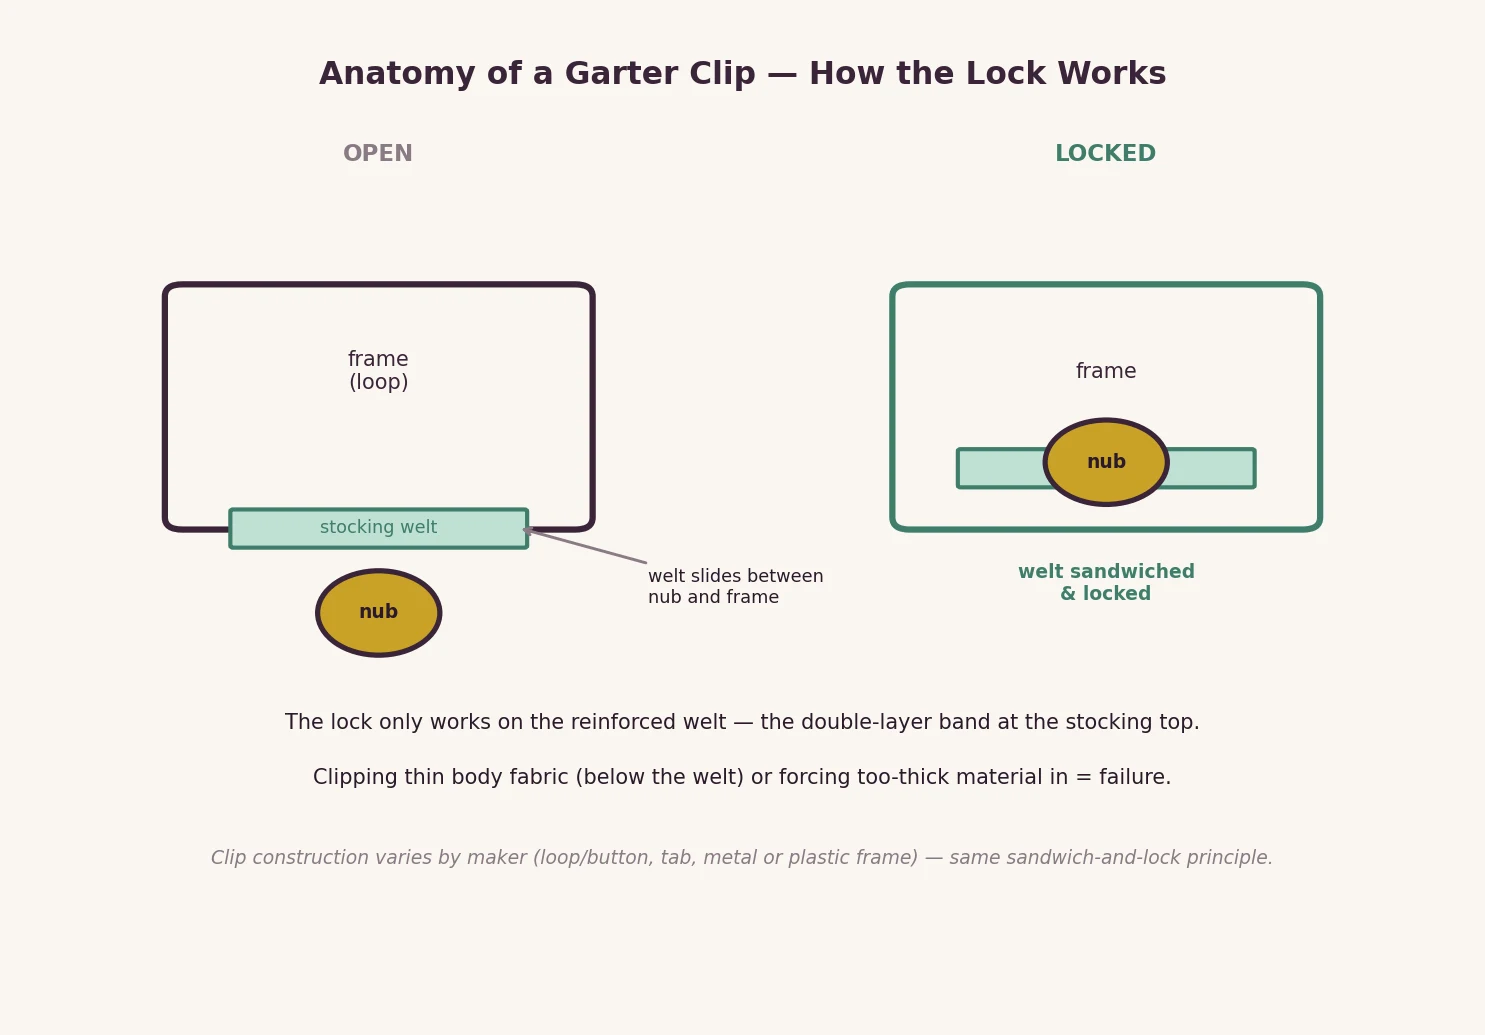
The common mechanism. A typical suspender clip is a small metal or plastic frame with a rubber or silicone nub (sometimes called a button). To attach it: slide the nub underneath the stocking’s top edge, then press or slide the frame’s loop over the nub so the fabric is sandwiched between them. The nub seats into the narrower part of the loop and locks. Done correctly, you can feel the lock engage — the clip shouldn’t slide along the fabric when you tug it gently.
Where on the stocking to attach. This is the critical detail: attach to the welt — the reinforced band at the very top of the stocking. The welt is typically a double layer of knit, built specifically to be gripped. Clipping into the thin, single-layer body fabric below the welt is the most common attachment failure: the fabric is too delicate to hold the lock, and the clip either slips off or tears through. Conversely, forcing very thick material into a clip not designed for it can prevent the lock from seating fully — the clip looks attached but isn’t locked, and it lets go under tension.
Variations exist. Some clips use a loop-and-button arrangement, others a tab that folds over. Metal frames with rubber nubs are the traditional standard; plastic exists and works on the same principle. The mechanism is the same idea in every case — sandwich the reinforced welt, lock it — but if your clips look different from the description above, read the manufacturer’s instructions for your specific hardware rather than forcing the generic method.
Practical tip from experienced wearers: attach the back clips first (they’re harder to reach once the fronts are tensioned), and consider sitting down or putting a foot on a chair while you work — adjusting at a natural seated height keeps the tension honest.
STRAP, Part 2 — Strap Tension
Strap tension is a balancing act with a specific target: enough downward pull to support the stocking, not so much that the straps drag the belt down with them. The belt is the anchor; the straps are the load. If the load overpowers the anchor, the whole system migrates south.
Work in this order:
- Start with moderate length. Lengthen the straps to a middle setting before attaching anything. You can always take up slack; starting too short pre-loads the system.
- Attach all straps first. Get every clip locked onto the welts before you adjust a single one. Adjusting with straps unattached gives you false readings.
- Adjust gradually and symmetrically. Take up length a little at a time, keeping front and back roughly balanced. Stand, walk a few steps, sit down — then reassess.
Never tighten one strap aggressively while the others stay loose. Uneven tension is one of the most common causes of twisting and rotation: a single over-tight strap pulls its side of the belt downward and sideways, rotating the anchor and dragging the neighboring clips off-axis. If your belt twists, the first suspect is asymmetric strap tension, not a defective belt.
A useful calibration: with the system fully attached, the stockings should feel supported and smooth — no sagging at the knee, no pulling sensation at the clip points. If you feel the belt itself being dragged downward when you stand, the straps are too short (too much tension relative to the anchor). Lengthen them slightly and recheck. The system should feel settled, not strained.
How Many Straps: Four vs Six vs Eight
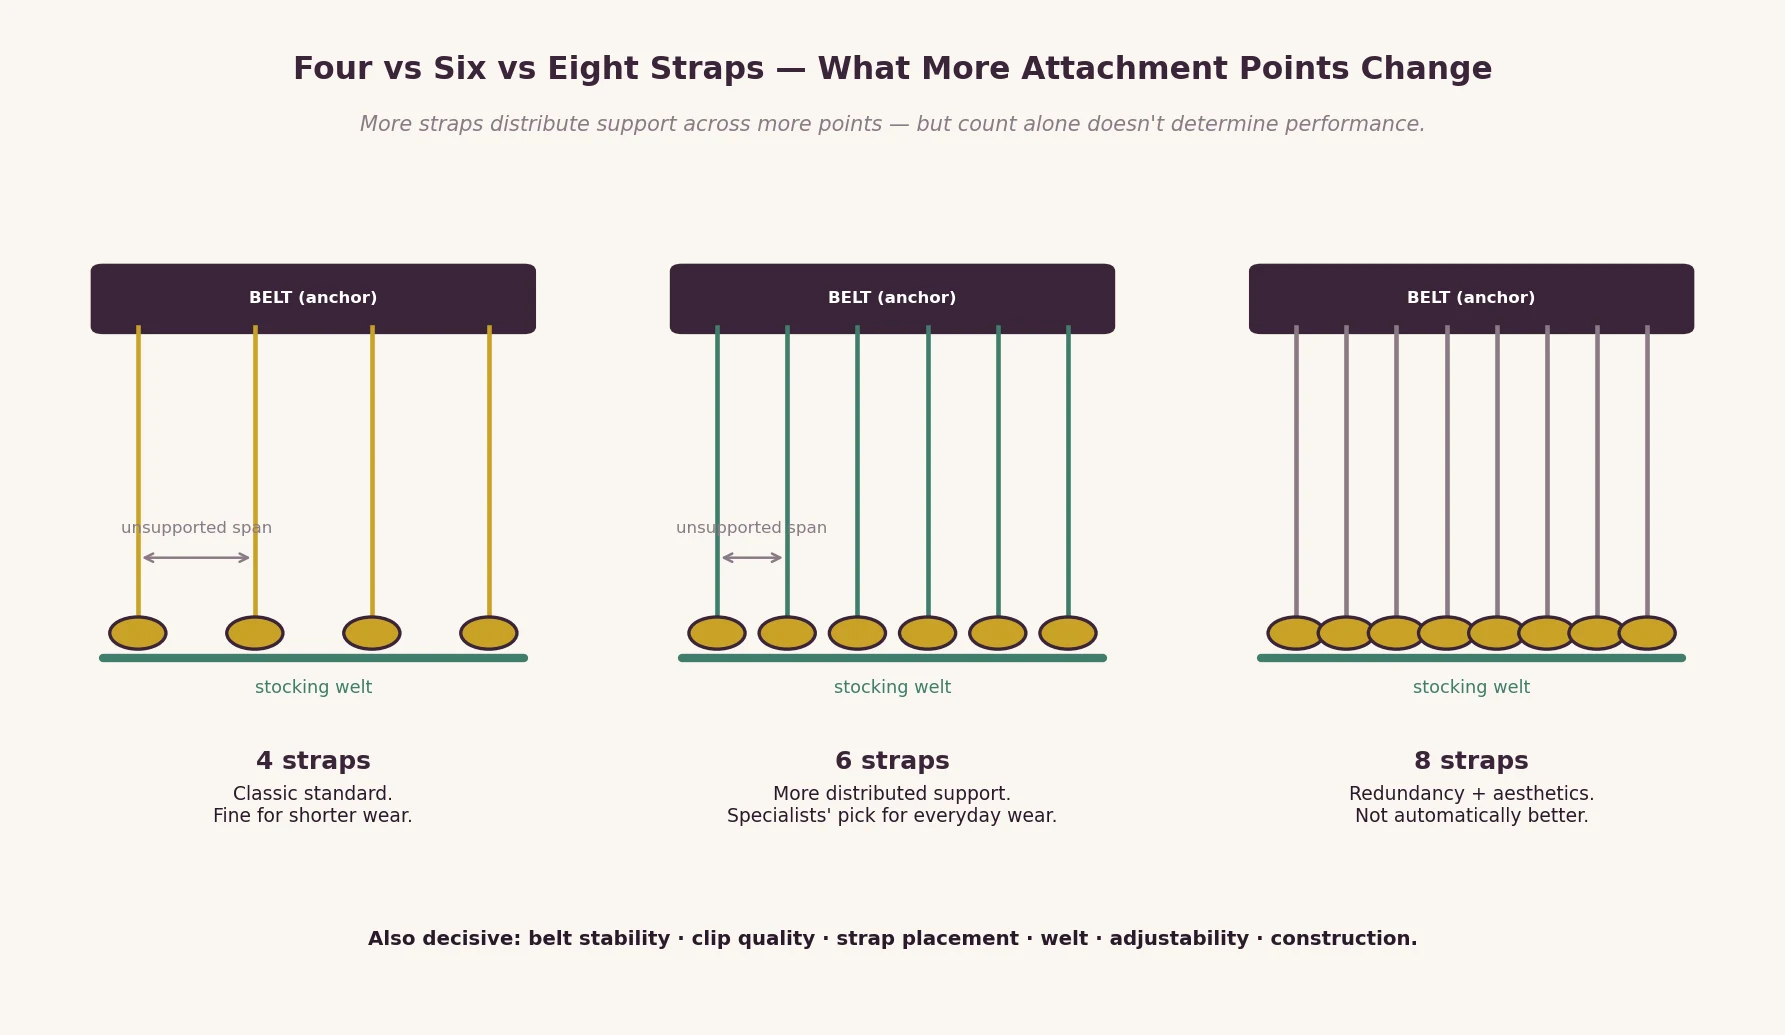
This is where buying advice gets loudest and least disciplined, so let’s be careful. The mechanical claim is real but limited: more attachment points distribute support across more locations. Six straps hold a stocking at six points instead of four, which means less unsupported fabric between grip points and less drift as you move. Vintage-focused specialists (What Katie Did, cited across fitter discussions) advise that six straps hold better than four for everyday wear — treat this as specialist guidance from a maker with deep category experience, not as a law of physics.
But strap count alone doesn’t determine performance. A six-strap belt with a flimsy anchor, weak clips, or poor strap placement can underperform a well-built four-strap belt. The variables that matter alongside count:
- Strap placement — are the straps positioned to pull straight down, or do they angle awkwardly?
- Belt stability — the anchor quality from the SET sections above.
- Clip quality — a great strap with a weak clip is a weak system.
- Stocking welt — the grip surface has to be compatible (see next section).
- Strap adjustability — can you actually balance the tension?
- Overall construction — wide structured belt vs. narrow decorative band.
So: do not conclude “8 straps are always better than 6” or “4 straps never work.” Four straps are the classic standard and perfectly functional for shorter wear; six is a reasonable choice if you want more distributed support for longer days; eight is largely about redundancy and aesthetics. Buy the count that matches your use case — and judge the belt as a whole system, not a number.
Stocking Compatibility
Not all hosiery is designed to work with garter clips, and mixing the wrong types is a quiet cause of failures people blame on the belt.
Stockings designed for garters. Traditional stockings (thigh-highs without any silicone band) have a reinforced welt at the top specifically built to be gripped by clips. This is the intended pairing — the system was designed around it.
Stay-ups / hold-ups. These have silicone bands at the top that grip the leg on their own. They can sometimes be clipped to a garter belt as well, and some wearers do this for redundancy — but be careful: the silicone band plus the stocking top can be too thick for some clips to lock properly, and the clip is gripping a surface designed to grip skin, not hardware. If you do this, verify the lock seats fully; don’t assume it. There’s no universal rule here — it depends on the specific stocking thickness and the specific clip.
Tights / pantyhose. These are a different garment with no welt to clip to and no need for a garter system. Wearing a garter belt over tights is a styling choice, not a functional one — the clips have nothing designed to grip.
The practical takeaway: when buying, check whether the listing mentions stocking compatibility. When troubleshooting a clip that won’t hold, ask whether the hosiery is the intended type before blaming the hardware. Retailer construction guides consistently recommend stockings with reinforced tops for this reason.
Order of Dressing
There’s no single mandatory sequence, but there is a most functional one, and the reasons behind it are worth understanding.
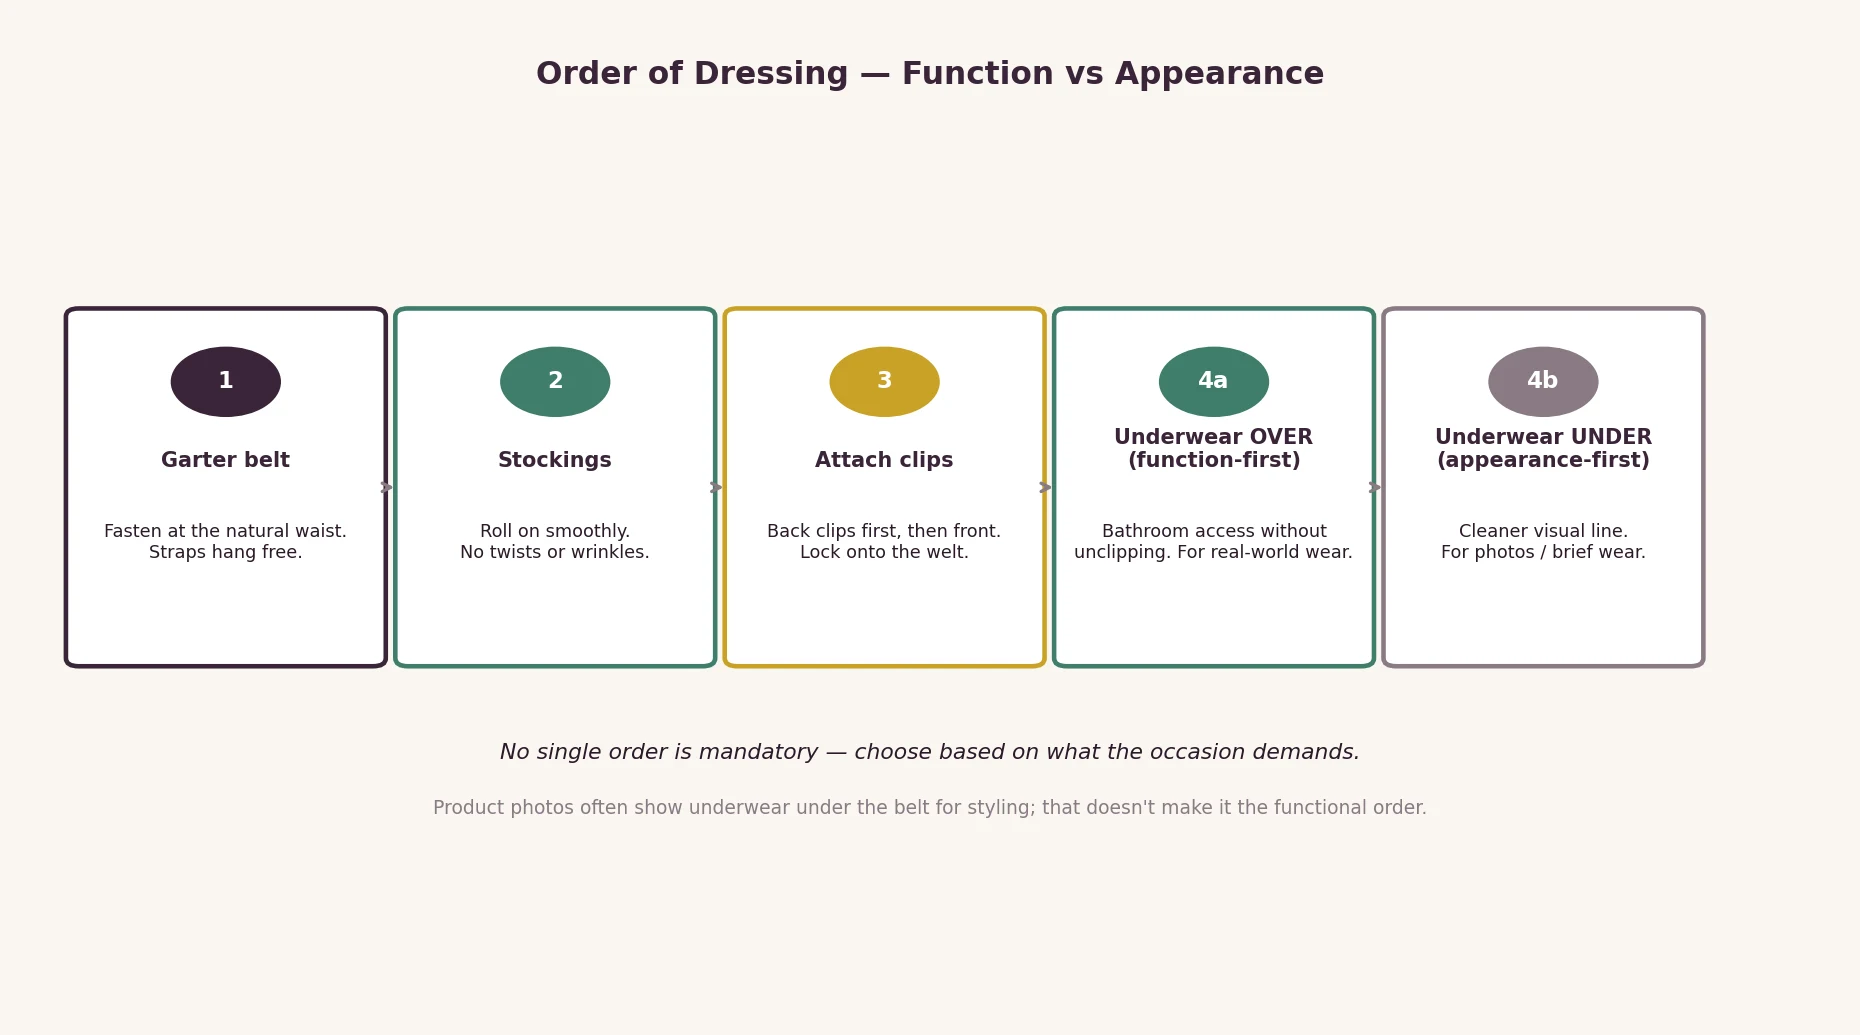
The common functional approach: belt first, then stockings, then clips, then underwear over the belt. The last step is the one people question, and the logic is practical — with underwear worn over the garter belt and straps, bathroom access doesn’t require unclipping everything and rebuilding the system. HerRoom’s fit guide states this explicitly as the correct order for function.
Why do product photos so often show underwear under the belt? Styling. The belt-over-underwear look photographs as a cleaner line, and for purely visual wear (photos, brief occasions), the functional order doesn’t matter. This is a genuine function-vs-appearance tradeoff, not a right-vs-wrong rule:
- Function-first (underwear over): choose this for real-world wear — workdays, events, evenings out. You keep the system intact all day.
- Appearance-first (underwear under): choose this for photography or very short wear, knowing you’re trading convenience for the look.
Pick based on what the wearing occasion actually demands.
STAY — The Slipping Diagnostic
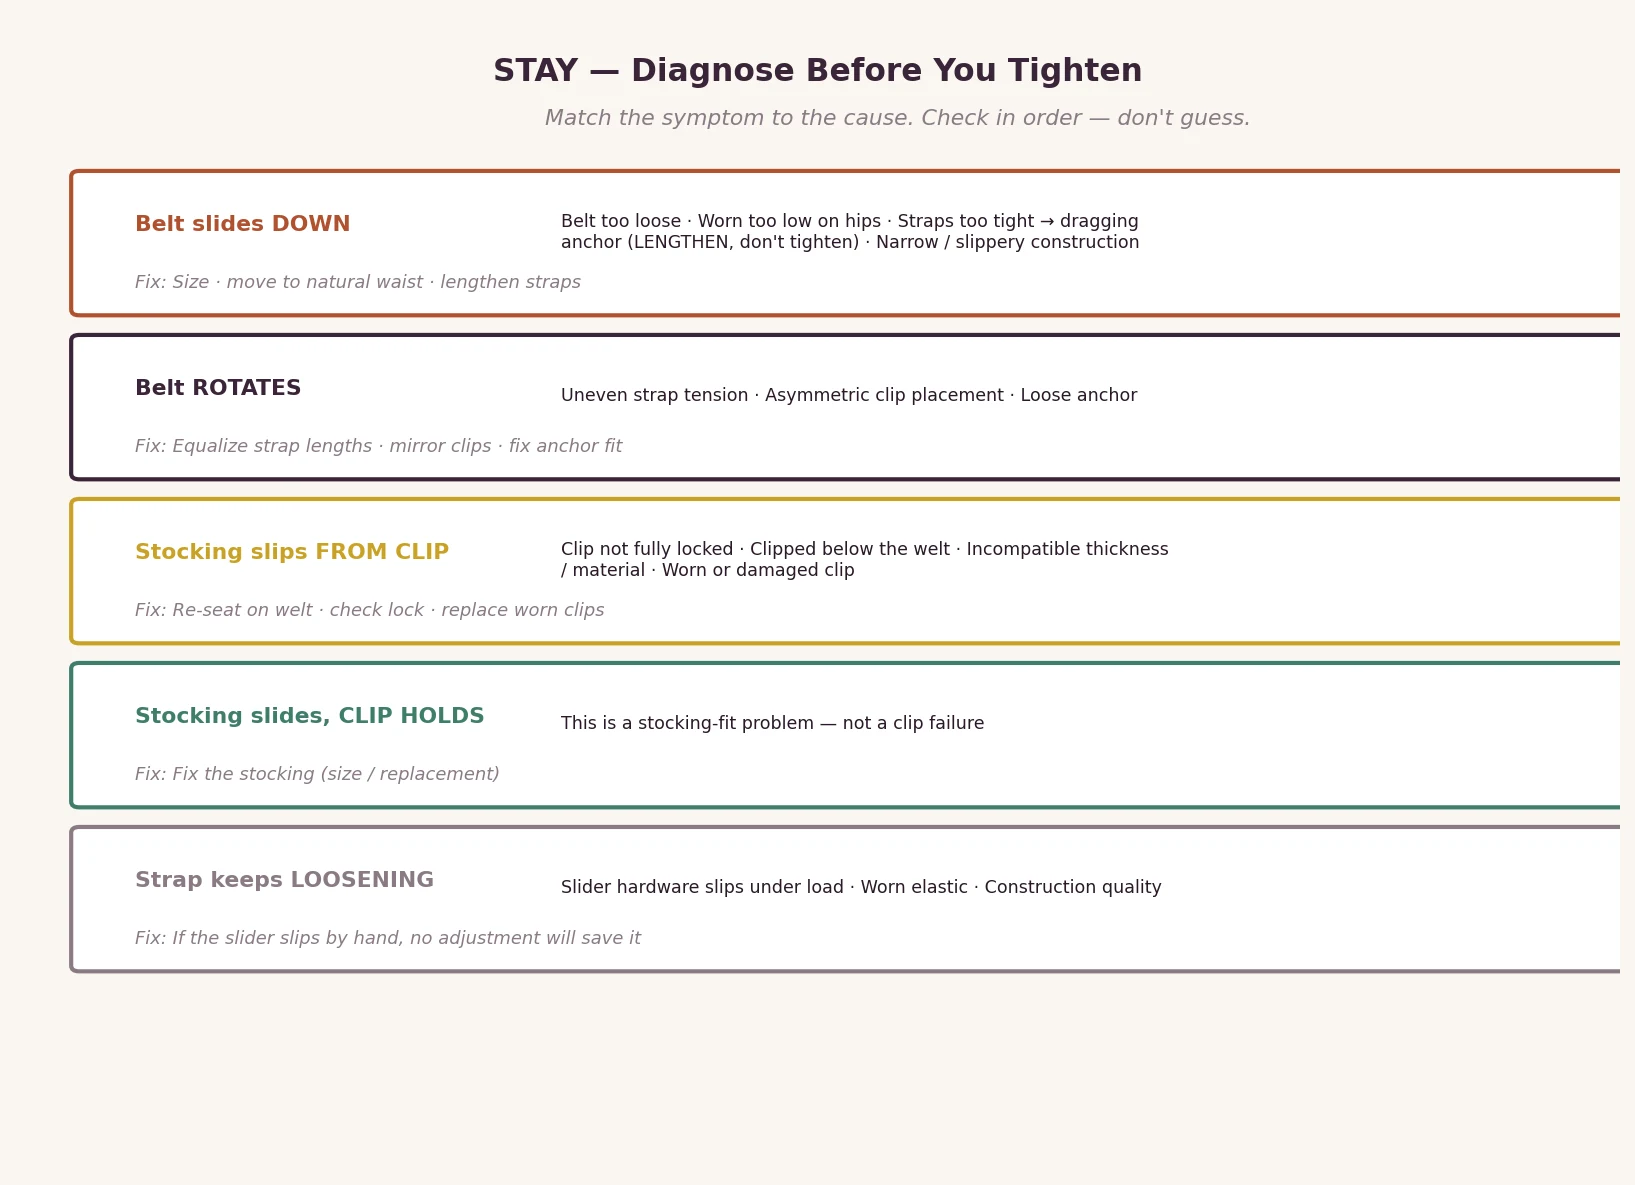
When something fails, don’t start over randomly. Match the symptom to the cause, check in order, fix precisely.
Belt slides downward
Sign: The whole belt migrates south over the course of wearing; straps go slack or drag.
Likely causes, in order:
- Belt too loose — the anchor can’t grip.
- Placement too low — worn on the hips where geometry resists anchoring less.
- Straps too tight relative to the anchor — the load is dragging the anchor down (lengthen straps, don’t tighten the belt).
- Narrow or slippery construction — the belt design itself offers little grip surface.
Check: Can you rotate the belt easily with your hands? Does it sit below your natural waist? Do the straps feel like they’re pulling the belt down when you stand?
Fix: Size down or adjust the closure; move placement to the natural waist; lengthen straps to rebalance load vs. anchor.
Belt rotates
Sign: The belt twists around your body; front straps end up at your side.
Likely causes:
- Uneven strap tension — one side pulling harder than the other.
- Asymmetric attachment — clips not mirrored left/right.
- Insufficient anchoring — a loose belt rotates freely.
Check: Are opposing straps at matching lengths? Are clips attached at mirrored positions on both legs?
Fix: Equalize strap lengths; reattach symmetrically; address anchor fit.
Stocking slips from the clip
Sign: The clip is still on the strap, but the stocking has come free.
Likely causes:
- Clip not fully locked — the nub never seated into the loop.
- Clipped outside the reinforced welt — attached to thin body fabric.
- Incompatible thickness or material — too thick for the clip, or a slippery silicone surface.
- Damaged or weak clip — worn spring, cracked frame, perished rubber nub.
Check: Tug the clip gently — does it slide along the fabric? Is the welt visibly inside the lock? Is the hardware intact?
Fix: Re-seat on the welt and confirm the lock engages; switch to garter-designed stockings; replace worn clips.
Stocking itself slides (but the clip holds)
Sign: The clip is locked and holding fabric, but the stocking still migrates down the leg.
Distinguish this carefully: this is a stocking fit problem, not a clip failure. The clip is doing its job — the stocking is too large for the leg, the elastic is worn, or the style isn’t suited to the leg. Fix the stocking (size, replacement), not the belt.
Strap keeps loosening
Sign: You set the length; an hour later the strap has extended itself.
Likely causes:
- Slider hardware that doesn’t grip — cheap or worn adjusters slip under load.
- Excessive movement working the slider loose.
- Worn elastic that has lost recovery.
- Construction quality — some straps simply aren’t built to hold a setting.
Check: Does the slider hold its position when you tug the strap firmly by hand?
Fix: If the slider slips by hand, no wearing adjustment will save it — this is a construction issue. Consider it in the pre-purchase checklist below next time.
The Pre-Purchase Checklist
Before buying, the listing should let you verify these. Every “can’t tell” is uncertainty you’re accepting:
- Number of straps — stated? (4/6/8 tells you about the intended use case.)
- Strap placement — visible in photos? Do they hang to pull straight down?
- Hardware material — metal vs. plastic disclosed? (Neither is universally superior — judge in context of the whole belt.)
- Adjustable strap length — sliders present and functional-looking?
- Waistband width — stated or measurable from photos? Wider generally anchors better.
- Back closure / adjustability — hook-and-eye rows? How many?
- Size-chart quality — does the brand publish its own chart with waist/hip ranges? (Apply our size-chart reading framework here.)
- Stocking compatibility notes — does the listing say what hosiery it’s designed for?
- Removable vs. fixed straps — matters for versatility and replacement.
- Return policy — acceptable for the remaining uncertainty?
FAQ
Should a garter belt sit on the waist or hips?
At the natural waist for most designs — the narrowest point of the torso gives the belt something to brace against, which is the mechanical basis of anchoring. Some belts are designed for lower-hip wear; if yours is, it needs a wider or more structured band to compensate for the less forgiving geometry. Check the listing’s stated intended rise.
How tight should a garter belt be?
Snug, not compressed. It should resist rotating when you push it with your hands and stay put under light strap tension — without requiring painful tightness. If you must cinch it uncomfortably to keep it up, the size or placement is wrong.
Why does my garter belt keep slipping?
Work the diagnostic in order: belt too loose, placement too low, straps too tight relative to the anchor (lengthen, don’t tighten), or narrow/slippery construction. The most common fix people miss is placement — moving the belt to the natural waist.
Can I wear underwear over a garter belt?
Yes — and for functional wear, it’s the recommended order: belt, stockings, clips, then underwear over everything. It keeps the system intact for bathroom access. Underwear-under is a styling choice for photos or brief wear.
Do I need special stockings for a garter belt?
You need stockings with a reinforced welt at the top — traditional garter-designed stockings. Stay-ups with silicone bands can sometimes be clipped but aren’t designed for it; verify the lock seats fully. Tights and pantyhose have nothing for clips to grip.
Are six straps better than four?
More attachment points distribute support across more locations, which helps for longer wear — specialist makers advise six over four for everyday use. But count alone doesn’t determine performance; belt stability, clip quality, strap placement, and the stocking welt matter as much. Four is the functional classic; buy for your use case.
The bottom line
A garter belt is a system: the belt anchors, the straps carry tension, the clips grip, and the stockings have to be built to be gripped. SET the anchor at the natural waist in the right size. STRAP with balanced, moderate tension and locked clips on the welt. STAY by diagnosing failures cause-by-cause instead of tightening blindly. Understand the machine, and it stops being fussy — it just works.
1 thought on “How to Wear a Garter Belt (Without the Slipping, Twisting, or Guesswork)”
Comments are closed.