Your bodysuit fits your bust. It fits your waist. It fits your hips. And yet it rides up, pulls at the shoulders, or digs at the closure — as if the size is wrong in a dimension the size chart never asked about.
That dimension is real, and it’s the one most size charts ignore: vertical length. A bodysuit is a one-piece garment. Unlike a top and bottoms, which fit your torso in two independent halves, a bodysuit has to span the full distance from your shoulders to your crotch in a single piece of fabric. When that vertical distance doesn’t match your body, no amount of getting the bust, waist, and hips right will fix the fit.
This article is a diagnostic guide. For each of the seven common causes, you’ll get the visible signs, a simple check you can do in under a minute, the likely fix — and, importantly, when “just size up” is the wrong answer.
A note on labels: if you’re unsure whether what you bought is technically a bodysuit or a teddy, that question is answered in our terminology guide: Bodysuit vs Teddy: What’s the Difference (and Does the Label Matter?). This article assumes you have a one-piece garment with a torso section and a bottom closure or enclosed bottom — whatever the retailer chose to call it.
The Short Answer: It’s Usually Vertical, Not Horizontal
Most fit advice treats “too small” as one problem. For a bodysuit, there are two separate problems that feel similar:
- Too short vertically — the garment doesn’t have enough length from shoulder to crotch. It pulls upward constantly, the closure digs, the shoulders get dragged down, the neckline sits lower than designed.
- Too tight horizontally — the garment doesn’t have enough width around the bust, waist, or hips. It compresses, side seams strain, leg openings cut in.
These have different causes and different fixes. Sizing up helps the second one. It only sometimes helps the first — and when it does, it can create a new problem (more on that under Cause 1). Learning to tell them apart is the single most useful skill in this article, so let’s make it concrete before we go further.
How a Bodysuit Should Actually Fit
A useful baseline, so you know what “right” feels like:
- The fabric sits smooth against the body without constant readjustment.
- You can raise your arms, sit down, and bend without the garment migrating.
- The shoulders feel neutral — neither dragged downward nor digging.
- The closure (snaps, hooks, or enclosed bottom) fastens without a fight and doesn’t pull open under normal movement.
- Nothing cuts in: not at the leg openings, not at the neckline, not at the closure.
- Snug is normal. A bodysuit is a close-fitting garment by design. Snug is not the same as strained. If the fabric looks like it’s under tension everywhere — seams pulling, surface stretched shiny — that’s strained, not snug.
If your bodysuit fails one or more of these, work through the causes below in order. Start with Cause 1: it’s the most common and the least understood.
The Key Distinction: Too Short vs. Too Tight
Keep this table in mind as you diagnose:
| Too short (vertical) | Too tight (horizontal) | |
|---|---|---|
| Main sensation | Constant upward pull, as if the garment wants to climb | Compression, squeezing around the body |
| Shoulders | Dragged down or under tension | Usually fine |
| Closure | Under continuous tension, digs or strains | Fastens okay but everything feels compressed |
| Seams | Vertical pull lines, neckline dragged lower | Side seams pulling outward, horizontal strain |
| Leg openings | May feel fine — the pull comes from above | Cut in, leave marks |
| Sitting test | Gets noticeably worse when you sit | Feels about the same sitting or standing |
The sitting test is worth highlighting: when you sit, your torso effectively lengthens (your lap rises, your shoulders stay put). A bodysuit that’s borderline short will feel fine standing and miserable sitting. If sitting is when the riding up starts, suspect vertical length first.
Cause 1: Your Torso Is Longer Than the Garment’s Vertical Room
This is the number-one cause, and the one almost no product page explains.
Every one-piece garment is cut with an assumed vertical distance from shoulder to crotch. If your body’s shoulder-to-crotch distance is greater than what the garment was cut for, the fabric has to make up the difference by stretching — and once the stretch is used up just spanning the distance, there’s nothing left for comfort. The garment pulls upward at every anchor point: shoulders, neckline, closure.
The cruel part: your bust, waist, and hip measurements can all match the size chart perfectly while this is happening. Those are horizontal measurements. They say nothing about the vertical.
Signs
- Constant upward pull, especially when sitting or bending
- Shoulder straps or shoulder seams feel like they’re being dragged down
- The neckline sits lower than it does on the product photos
- The closure is under visible tension or digs in
- Sizing up in the past gave you bagginess at the bust/waist but didn’t fully fix the pull
The check: measure your torso loop
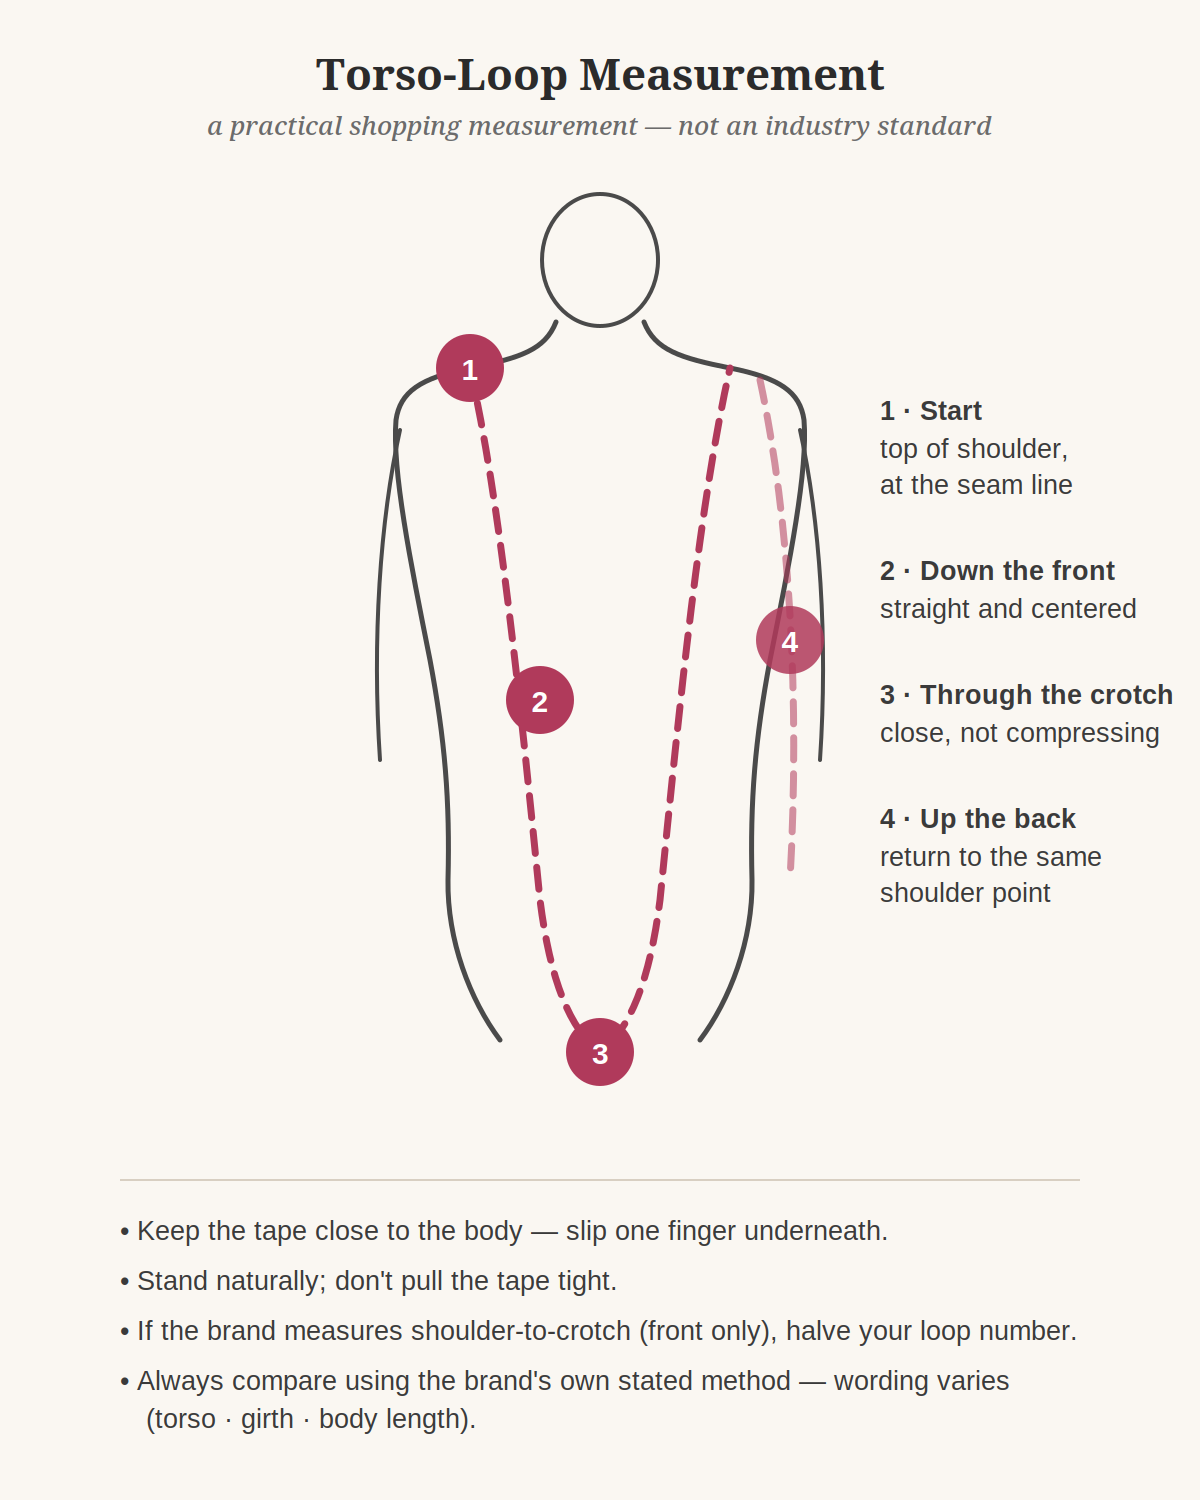
This is a practical shopping measurement — not an industry standard, because no universal one exists. Different brands use different words (“torso,” “girth,” “body length”) and different methods, which is exactly why you should take your own number and compare it against each brand’s stated method.
You’ll need a soft measuring tape. Wear thin, close-fitting clothing.
- Start at the shoulder. Place the end of the tape at the top of one shoulder, roughly where a shoulder seam would sit — not up at the neck, not out at the shoulder tip.
- Run it down the front. Bring the tape straight down the front of your torso, keeping it centered.
- Through the crotch. Pass the tape between your legs, keeping it close to the body without pressing in.
- Up the back. Bring it up your back to the same shoulder point where you started. You’ve now made a full loop.
- Read it relaxed. The tape should sit close to the body but not compress it — you should be able to slip a finger underneath. Stand naturally. Don’t pull the tape tight; you’re measuring the distance the garment must span, not trying to minimize a number.
Write the number down. That’s your torso loop.
Comparing it to a size chart: this is where brand variation matters, so read the brand’s own method before comparing. Some brands publish a full loop (“girth” or “torso loop”); others publish a front-only number (“shoulder to crotch” or “body length”). If the brand measures front-only, halve your loop number for comparison. If the brand publishes nothing vertical at all — which is common — you have no direct comparison, and that’s honest uncertainty (see the listing section below for how to handle it).
The fix
- Look for long-torso or tall options first. Some brands cut the same style with extra vertical length. This is the cleanest fix because it adds length without adding width.
- Size up with caution. Sizing up usually adds some length — but it adds width everywhere too. If your horizontal measurements already match the chart, sizing up can trade one problem (too short) for another (gaping at the bust, loose waist, excess fabric). It works best when you’re between sizes horizontally anyway.
- When sizing up is NOT the fix: if the size chart’s horizontal measurements already match you and the only symptom is vertical pull, sizing up is likely to disappoint. You need length, not width.
Cause 2: You Sized by Bust, Waist, and Hips — and the Chart Stopped There
Most size charts are built for separates: they give you bust, waist, and hips, and that’s the whole story. For a one-piece garment, that story is missing its most important chapter.
This is worth stating plainly: a three-measurement chart is an incomplete sizing tool for a bodysuit. It’s not that the numbers are wrong — it’s that they measure the wrong dimensions for the garment’s hardest fit requirement.
Signs
- You carefully matched all three measurements to the chart and the fit is still wrong
- The garment feels right around the body but wrong along its length
- You’ve returned multiple bodysuits in “your size” with the same complaint
The check
Look at the size chart again and ask: does it include any vertical measurement? Look for these terms (brands don’t agree on wording):
- Torso / torso length / torso loop
- Girth
- Body length
- Garment length
- Shoulder to crotch
If none appears, the chart cannot tell you whether the garment is long enough for you — no matter how precisely you measured your bust, waist, and hips.
The fix
- When a chart includes a vertical measurement, use it as your primary filter — before the horizontal numbers.
- When it doesn’t, treat the purchase as higher-uncertainty: check reviews for mentions of length, look for long-torso options, and favor retailers with workable return policies for bodysuits.
- Don’t assume a missing vertical number means “average will be fine.” It means unknown.
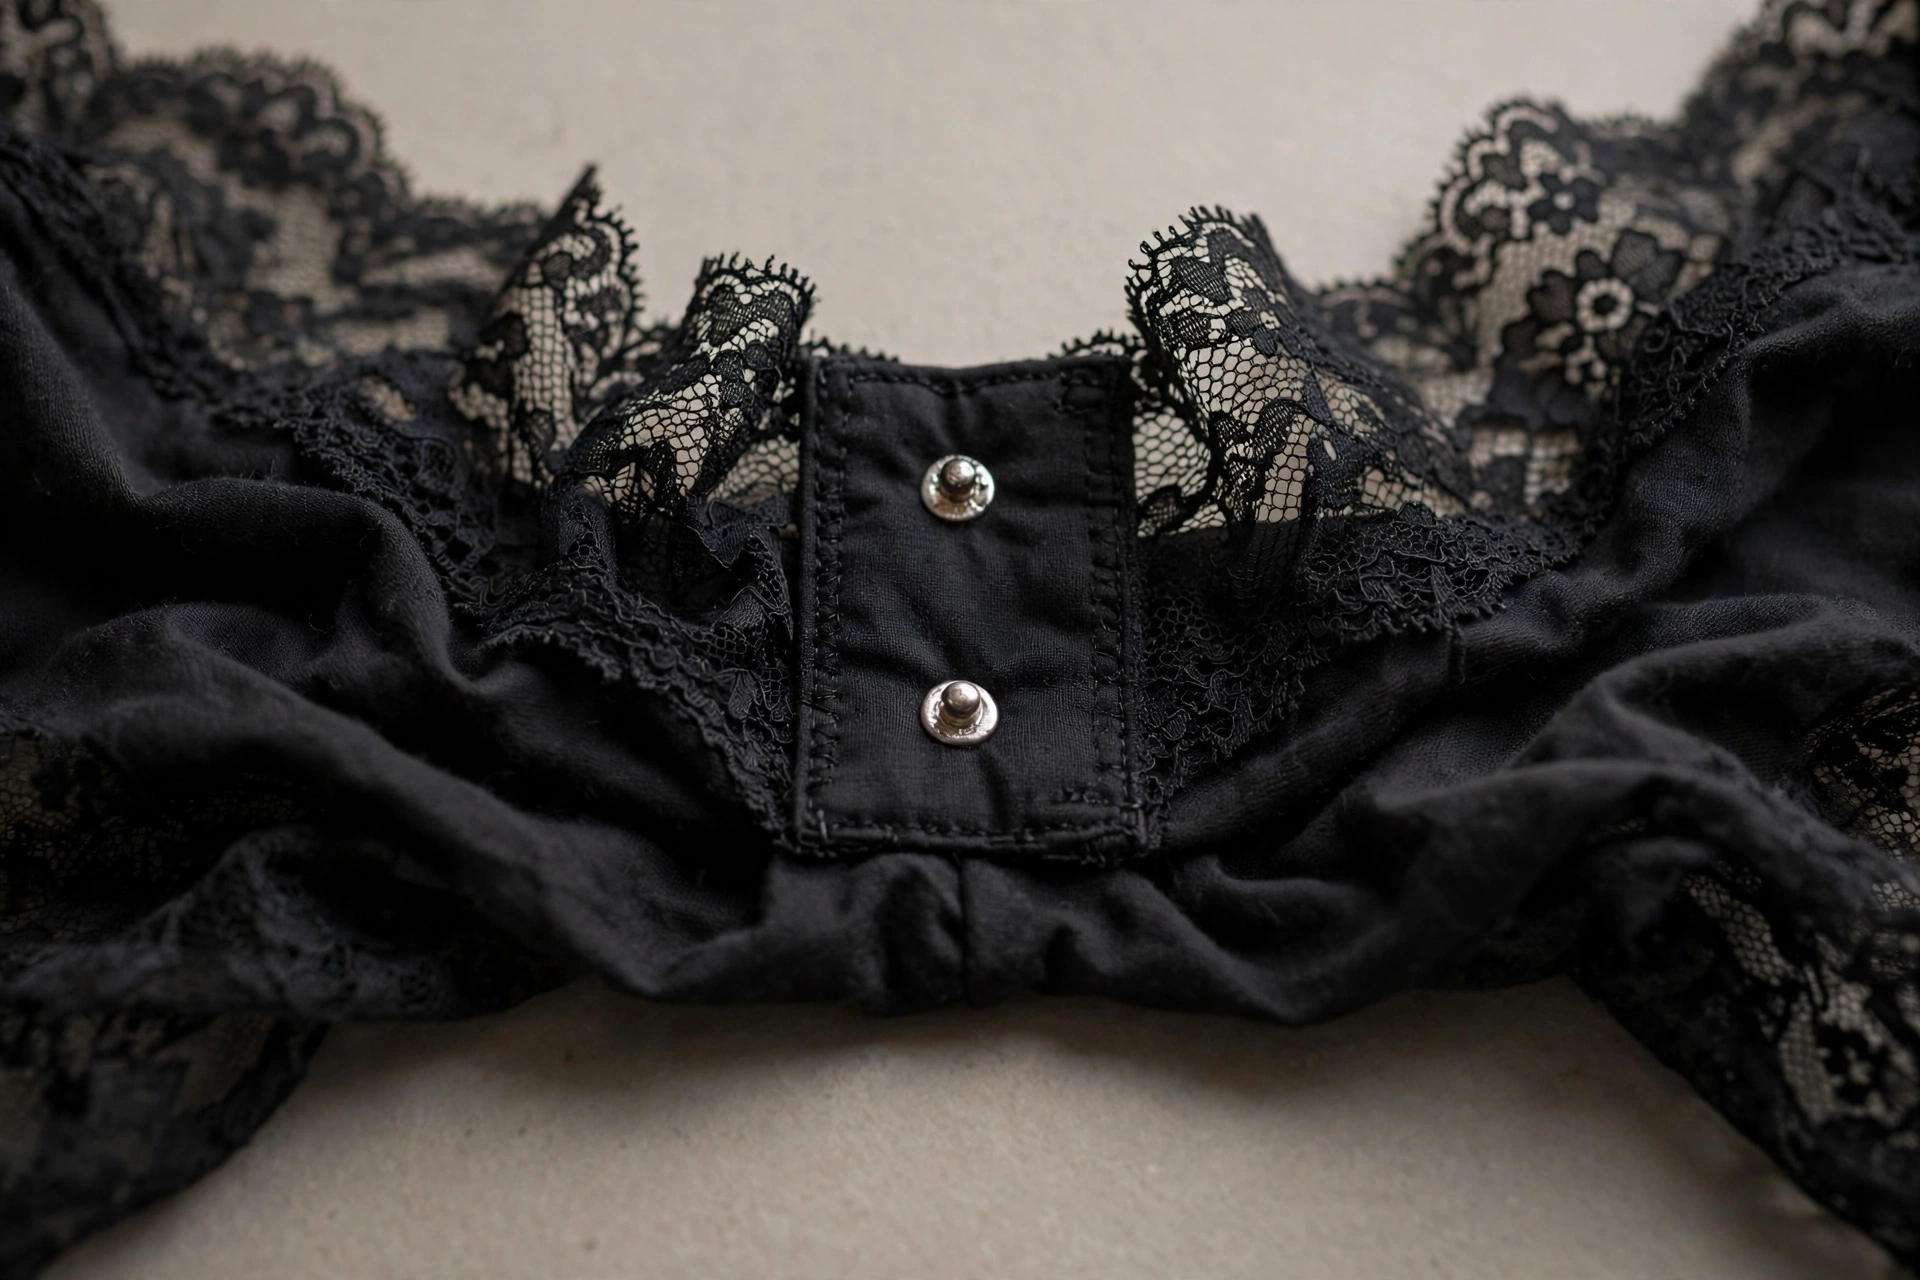
Cause 3: Snap or Gusset Tension at the Closure
The closure is where vertical shortage makes itself felt most acutely — but closure discomfort isn’t always a length problem. Sometimes the geometry of the closure itself is the issue.
A quick vocabulary note: the gusset is the fabric panel at the crotch; the closure is whatever fastens there (snaps, hooks, or in some designs nothing — a fully enclosed bottom). A short gusset or a closure placed far forward/back changes where tension lands.
Signs
- The closure digs, pinches, or feels like it’s under constant strain
- Discomfort is localized at the crotch rather than spread across the garment
- The rest of the bodysuit — shoulders, neckline, legs — feels fine
The check
Fasten the closure and stand naturally. Now sit down. If sitting turns mild awareness into real discomfort, the gusset doesn’t have enough depth for your body in a seated position — the garment’s vertical room runs out exactly where you bend.
Also check: are you fighting the snaps to get them closed at all? A closure that requires real force to fasten is telling you the garment is under tension before you even move.
The fix
- If the whole garment pulls (shoulders + neckline + closure), this is Cause 1 wearing a closure-shaped mask — address torso length.
- If only the closure bothers you and everything else fits, the issue may be closure geometry: a longer gusset, a different snap placement, or a different cut (see Cause 7) may solve it where sizing changes won’t.
- When the closure is not “defective”: a snug closure on a correctly-sized garment is normal — it has to stay fastened during movement. Discomfort under normal movement is the signal, not snugness itself.
Cause 4: The Straps Are Carrying Load They Shouldn’t
Shoulder straps on a bodysuit have one job: keep the top of the garment positioned. They are not supposed to act as suspension cables holding up a torso section that’s too short. But when the vertical length is insufficient, the straps become the unwilling heroes — and your shoulders pay for it.
Signs
- Shoulder pain, pressure, or digging — while the body of the garment feels okay
- You’ve tightened the straps trying to stop the riding up, and it got worse
- Red marks on the shoulders after wearing
The check
Loosen the straps a notch or two. If shoulder comfort improves but the garment now sits wrong elsewhere (neckline too low, closure pulling harder), that’s diagnostic gold: it proves the straps were compensating for missing vertical length. The straps weren’t the problem — they were the symptom.
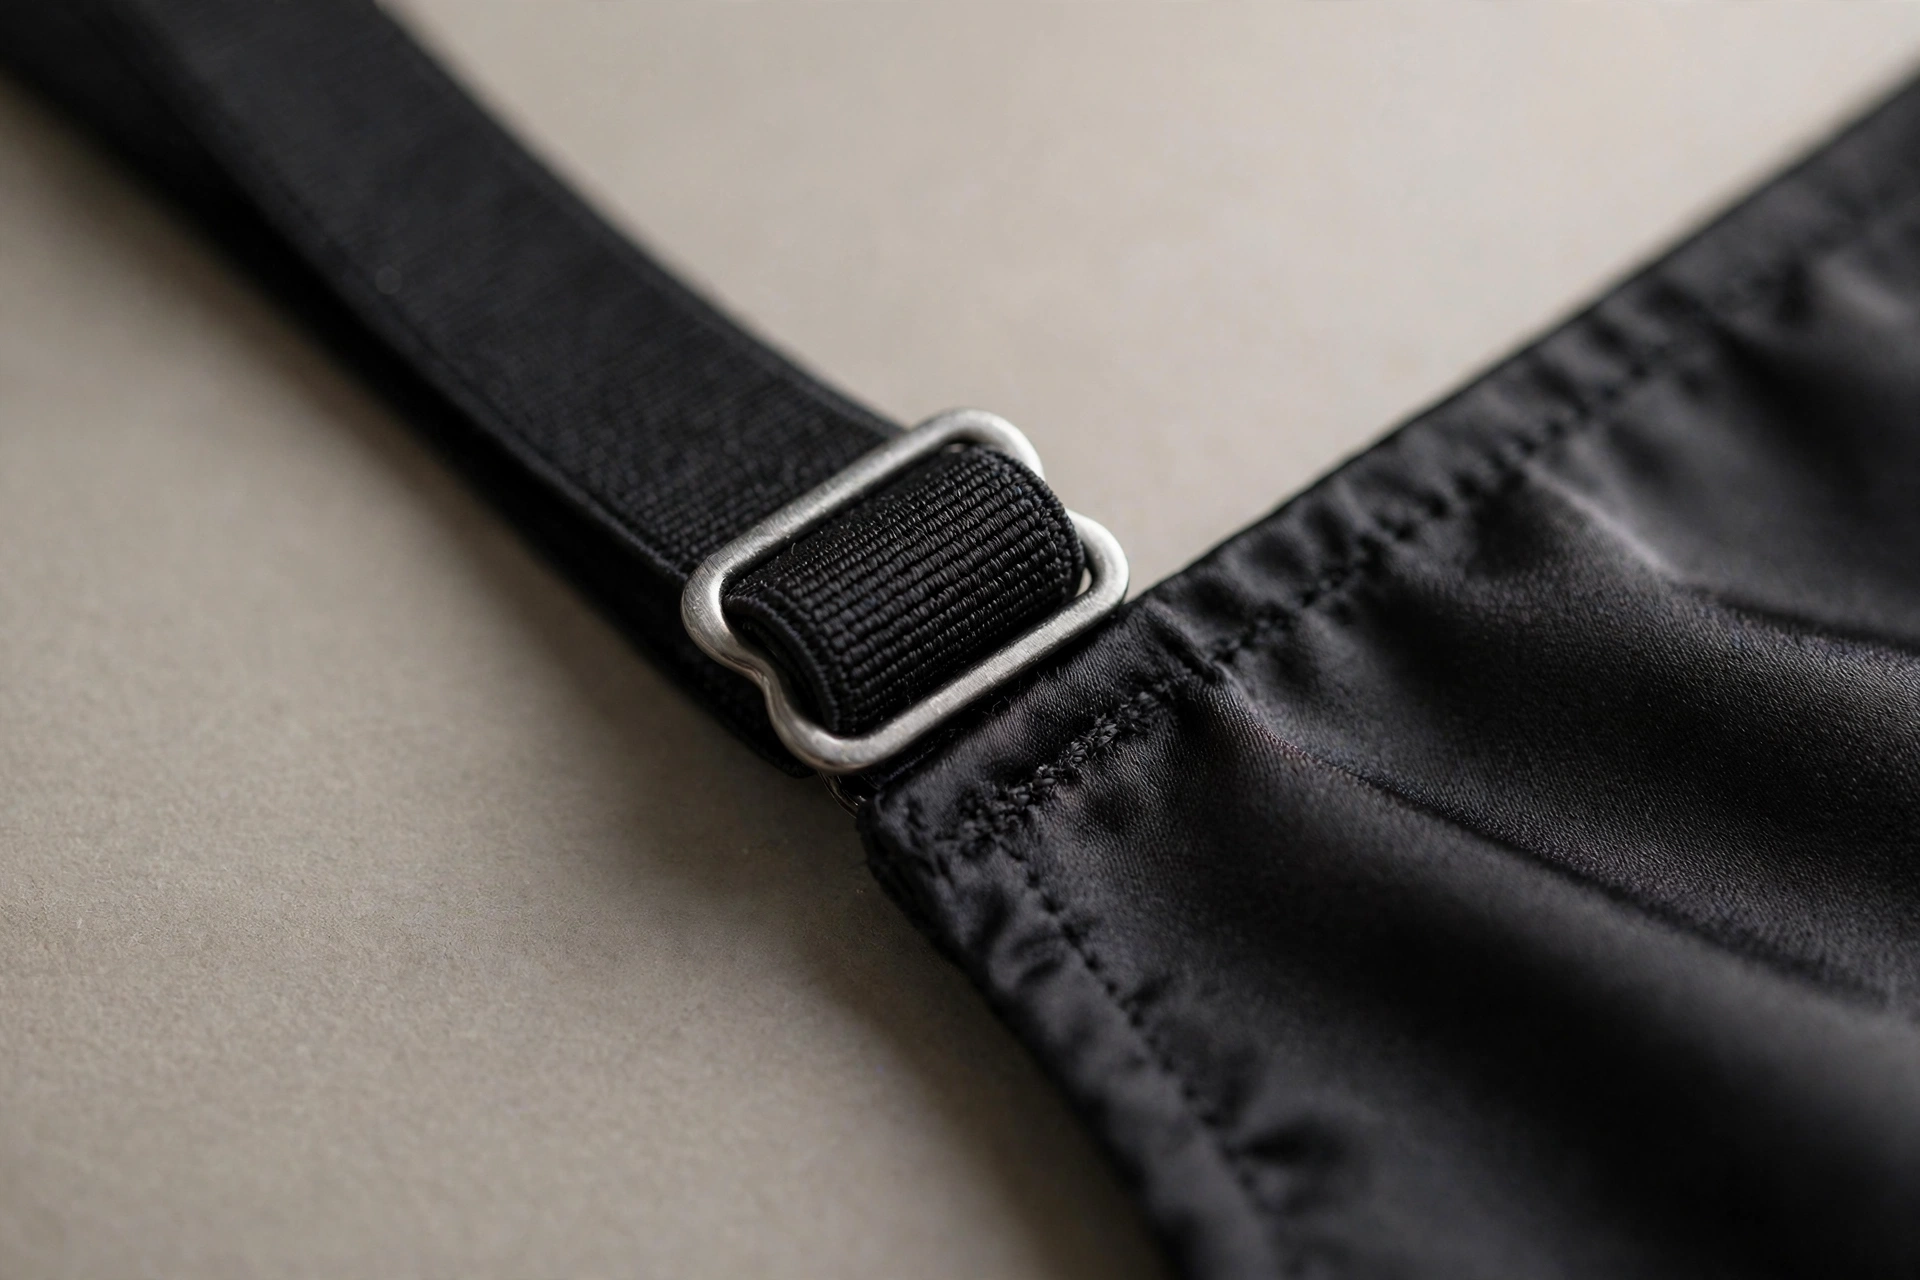
Also note whether the straps are adjustable at all. Fixed straps give you no way to fine-tune; on a borderline fit, adjustable straps (with sliders) let you distribute tension instead of concentrating it.
The fix
- Set straps to just take up slack — not to hoist the garment into place. If the garment only works with straps cranked tight, the length is wrong.
- Prefer adjustable straps when buying; check the listing photos for sliders.
- When tightening is NOT the fix: over-tightened straps on a too-short torso pull the neckline down, dig the shoulders, and change nothing about the actual shortage. Loosen first, diagnose second.
Built-in bra note: some bodysuits include a real bra structure (underwire, band, cups) rather than just a shelf lining. If the bra portion itself rides up at the back, that’s a bra-fit problem inside a bodysuit — our guide to why bra bands ride up covers that specific failure. Don’t confuse it with bodysuit vertical tension.
Cause 5: Leg-Opening or Hip Tension Pulling Everything Upward
Tension doesn’t only come from above. If the leg openings or hip area are too tight, they grip and climb — and because the garment is one piece, that upward climb transmits through the whole torso.
Signs
- The garment migrates upward during normal movement (walking, sitting, stairs)
- Leg openings leave deep marks or feel like they’re cutting in
- The riding up eases if you pull the leg openings down — then returns within minutes
The check
Look at the leg cut in the product photos or on your body: higher-cut legs (cut well above the hip crease) have less fabric anchoring them and climb more easily. Tight elastic at the opening compounds it. Then check the hip measurement against the chart — insufficient hip room means the garment is being pulled up by the widest part of your body every time you move.
The fix
- If hip measurements are at the top of the size range, size up — this is one case where sizing up genuinely helps, because the problem is horizontal.
- Compare leg cuts across styles: a lower, fuller leg opening stays put better than a high-cut one on the same body.
- Describing without labels: the issue is measurable — leg-opening tension, hip-room shortage, cut height — not a body category. Two people with identical hip measurements can get different results from different cuts, which is why cut matters as much as size.
Cause 6: The Fabric Stretches but Doesn’t Recover
Not all stretch is equal. A fabric can stretch impressively on the first wear and still be the reason your bodysuit rides up — because what matters isn’t just how far it stretches, but whether it comes back.
Useful distinctions when thinking about stretch:
- Stretches easily vs. resists: how much force it takes to elongate the fabric.
- Stretches vertically vs. only horizontally: some knits give generously across the width but barely along the length. A bodysuit needs vertical give.
- Recovers vs. stays elongated: after stretching, does the fabric snap back or does it bag out? Poor recovery means the garment gradually migrates and never returns.
- Supportive vs. merely elastic: compression-feel fabrics hold position; flimsy-stretch fabrics move with you and then keep moving.
Signs
- The bodysuit fit well for the first hour and got worse through the day
- The fabric looks “tired” — bagging in some areas, strained in others
- Washing made it worse (heat and agitation degrade elastic fibers over time)
The check
Before buying, read the fabric composition — but treat it as a hint, not a verdict. A high elastane content suggests stretch; it doesn’t tell you about recovery or direction. Reviews mentioning “stretched out,” “baggy by evening,” or “had to keep pulling it down” are more informative than the fiber percentages.
After buying, the wear test: put it on, move normally for an hour. If fit degrades with time rather than staying constant, you’re looking at a recovery problem.
The fix
- Favor retailers and reviews that describe recovery (“keeps its shape”) over raw stretch claims.
- Care matters: heat is the enemy of elastic fibers. Wash cold, skip the dryer — this genuinely extends the period before recovery fails.
- No invented numbers: unless the manufacturer publishes tested stretch/recovery figures (rare), don’t trust precise-sounding percentages in marketing copy. “4-way stretch” describes direction, not quality.
Cause 7: The Cut Itself Isn’t Compatible
Sometimes the answer isn’t your size at all. It’s the pattern.
Bodysuit cuts vary enormously: neckline depth, strap placement and width, leg cut height, gusset length and position, back coverage, compression level. Each of these changes how the garment distributes tension. A cut designed for a long, straight torso section will behave differently on a shorter one — and neither body nor garment is “wrong.” They’re incompatible.
Signs
- You’ve tried multiple sizes in the same style with the same complaint
- The problem persists even when measurements match the chart generously
- A different brand’s bodysuit in the same nominal size fits fine
The check
Compare construction details across the styles that worked vs. the ones that didn’t: gusset depth, strap adjustability, leg cut, neckline. The pattern that emerges — “every high-cut style rides up on me,” “every fixed-strap style digs” — is your personal cut compatibility map. It’s about garment geometry, not about your body needing to change.
The fix
- Stop re-buying the same cut in different sizes. Change the cut: different leg line, adjustable straps, deeper gusset, different neckline.
- “This specific cut is not compatible with the fit I want” is a legitimate conclusion — and a better one than another round of size roulette.
How to Read a Bodysuit Listing Before You Buy
Most riding-up stories start at the product page. Here’s what to inspect before ordering:
- Does the size chart include a vertical measurement? Look for torso, girth, body length, garment length, or shoulder-to-crotch — brands use different words. Its absence means the chart can’t answer the most important fit question.
- Is the listed length a garment measurement or a body measurement? A “length: 28 inches” might describe the garment laid flat (which includes stretch assumptions) or the body it’s meant to fit. These are different numbers; listings often don’t say which.
- Is the model’s height disclosed? If yes, it’s a weak but nonzero signal for length-heavy garments. If no, you have nothing.
- Are the straps adjustable? Look for sliders in the photos. Adjustability won’t fix a short torso, but it gives you tuning room on a borderline fit.
- Is the closure adjustable or fixed? Multiple snap positions or hook rows add forgiveness; a single fixed closure doesn’t.
- Is fabric stretch described with any substance? “4-way stretch” is better than nothing; recovery mentions (“retains shape”) are better still. Vague “stretchy fabric” tells you nothing.
- Are tall or long-torso versions offered? Their existence tells you the brand knows vertical fit matters — a good sign for the accuracy of their other measurements.
- What is the garment designed for? Compression shapewear, fashion layering piece, and lingerie bodysuits fit differently by intent. A compression garment that “rides up” might just be sized for a firmer fit than you want.
Why model height alone doesn’t predict fit: a 5’9″ model and a 5’9″ shopper can have meaningfully different torso lengths — height distributes differently between legs and torso. Model height tells you the garment’s proportions on one specific body, not whether its vertical length matches yours. Useful as a rough visual reference; useless as a measurement.
Decision Tree: Find Your Cause in 60 Seconds
Work top to bottom. Stop at the first description that matches.
- Fits around the body but pulls upward, worse when sitting → investigate torso length first (Cause 1). Measure your torso loop and compare.
- Tight everywhere — compression at bust, waist, hips, leg openings → overall size likely too small (horizontal problem). Size up.
- Only the closure digs; everything else feels fine → check gusset depth and closure design (Cause 3). May be geometry, not size.
- Shoulders hurt but the body width feels fine → check vertical length and strap setting (Cause 4). Loosen straps as a diagnostic step.
- Leg openings cut in and the garment climbs as you move → check hip room and leg cut (Cause 5). This one often does respond to sizing up.
- Fit was fine at first, degrades through the day → fabric recovery problem (Cause 6). Care changes and different fabric behavior next time.
- Measurements match but it still rides, across multiple sizes → cut incompatibility (Cause 7). Change the style, not the size.
Frequently Asked Questions
Should I just size up if my bodysuit rides up?
Not automatically. Sizing up helps when the problem is horizontal tightness — compression at the bust, waist, hips, or leg openings. When the problem is vertical (the garment is too short from shoulder to crotch), sizing up adds width you may not need while only partially adding length. Diagnose first: if it fits around the body but pulls upward, suspect length, not size.
How do I know if I need a long-torso bodysuit?
Two signals: the symptoms (constant upward pull, shoulder drag, closure tension, worse when sitting) and the measurement. Take your torso loop as described above and compare it against any vertical number the brand publishes. If no brand you like publishes one, the symptom pattern alone is enough reason to try a long-torso option.
Why does my bodysuit fit everywhere except the shoulders?
Because the straps are compensating for missing vertical length. When the torso section is too short, the straps become load-bearing — they hold the garment up by your shoulders instead of the garment spanning the distance on its own. Loosen the straps slightly: if comfort improves but the fit goes wrong elsewhere, you’ve confirmed the diagnosis.
Do painful snaps mean the bodysuit is too small?
Not necessarily. Snaps under tension can mean the garment is too short vertically (Cause 1), or it can mean the gusset is shallow or the closure geometry doesn’t suit you (Cause 3) even at the right size. Location matters: pain only at the closure with a comfortable fit elsewhere points to geometry; pain at the closure plus shoulder pull and a low neckline points to length.
How tight should a bodysuit feel?
Snug, not strained. It should sit smooth, stay in place when you move, and let you breathe, sit, and raise your arms comfortably. If seams look like they’re under tension, the surface stretches shiny, or you can’t wait to take it off — that’s too tight or too short, not “how bodysuits are supposed to feel.”
Can I trust the size chart?
Partially. Trust it for what it measures: bust, waist, and hips against the brand’s own numbers. Don’t trust it for what it doesn’t measure — if there’s no vertical dimension on the chart, the chart cannot
tell you whether the bodysuit is long enough. That’s a gap in the tool, not a failure in your measuring.
Our guide to reading lingerie size charts shows how to use the brand’s own chart as a decision tool — including what to do when your measurements span two sizes.
A bodysuit that rides up is rarely a mystery once you stop treating “size” as a single number. Check the vertical dimension first, isolate which part of the garment is actually under tension, and let the symptoms — not the size label — tell you whether you need length, width, a different closure, or a different cut entirely.
Confused by what the retailer actually sold you? Start with Bodysuit vs Teddy: What’s the Difference (and Does the Label Matter?) — then come back here to make it fit.
1 thought on “Why Does My Bodysuit Ride Up? 7 Causes and How to Fix Each”
Comments are closed.